All times are UTC


It is currently Sat Apr 20, 2024 2:50 am


Post new topic Reply to topic  [ 259 posts ]  Go to page Previous  1 ... 9, 10, 11, 12, 13  Next
Author Message
 Post subject: Re: Dr Grant's WIP [Thranduil, Laketowners and Mirkwood Spid
PostPosted: Wed Jun 18, 2014 12:35 am 
Elven Elder
Elven Elder
Offline

Joined: Thu Dec 20, 2012 12:18 pm
Posts: 2528
Location: Dallas, Texas
I really like the spiders. That's a great use of wasted base - space. And the board is top notch!

_________________
Commission Painting @FB http://www.facebook.com/squyrepainting
Commission Customers include:
GBHL Youtube Channel
MiniWargaming
Top
  Profile  
Reply with quote  
 Post subject: Re: Dr Grant's WIP [Thranduil, Laketowners and Mirkwood Spid
PostPosted: Mon Jun 23, 2014 10:57 am 
Craftsman
Craftsman
Offline

Joined: Fri Jan 27, 2012 1:21 pm
Posts: 338
Location: Diest
Excellent work, I really love your board.

_________________
Backlog:
21/01/2015: still 319 Models to paint or 27,01%
30/12/2016: Somehow the backlog has risen up to 900+ models :/
Top
  Profile  
Reply with quote  
 Post subject: Re: Dr Grant's WIP [Thranduil, Laketowners and Mirkwood Spid
PostPosted: Fri Jun 27, 2014 4:07 pm 
Ringwraith
Ringwraith
User avatar
Offline

Joined: Fri Aug 03, 2012 1:50 pm
Posts: 1339
Wow! Thanks so much for all the amazing comments guys, it's really humbling getting such good feedback from such great painters and it's really very much appreciated, just glad all the effort I put in wasn't wasted :-)

Harfoot wrote:
Thanks Dr G, really enjoyed reading that, its like good old White Dwarf articles.


And that's just about the nicest comment anyone could have, thanks so much buddy, I really appreciate it!

So I've been relatively busy over the last couple of weeks, as promised I got Thrydan done in time for last weekend's An Unexpected Desolation. He was a really cool model to paint, the first Dunlending I've done and very different from everything else I've been working on of late, really enjoyed it to be honest, cool model and quite pleased with how he turned out! How did he got on at the weekend I hear you ask? You'll just have to wait for the Dr Grant's Adventures at An Unexpected Desolation thread to go up! Still a bit behind on my tournament reports at the mo but my Desolation of Cumberbatch one is nearly finished and should be online in the next week.

Image

Image

Image

Image

After Thrydan I also found time to squeeze in a coupe of Hobbits. GBHL Jamie was staying at mine this weekend and we filmed a bunch of narrative scenarios for the channel. It was a great chance to get these guys painted up and on the table. I was really chuffed to get them done as they were soooooo long down the painting queue that they were unlikely to see the brush for many a year, it was nice to have some inspiration to paint up such cool and thematic classic models. Again, fairly pleased with how they all came out, they were fairly quick to paint up, just a couple of hours each. They're lovely sculpts and they really help with immersing yourself into the scenarios so look out for them in a GBHL bat-rep over the next week or so! Hope you like!

Image

Image

Image

That's it for now, back up to date, next on the table for me is Beorn in bear form to boost my BOFA force. I'm really excited about this one, been looking forward to painting the bear since back in January when I painted the man form (page 8 of this thread). He's cleaned up and assembled but looks like he needs a fair bit of green-stuff work to fill the gaps. Got a lot on for the next two weeks but I'm hoping to use him in a game on Thursday 10th so look out for pics around then!

Cheers guys and thanks again for the comments!

_________________
Finished 2nd in the 2014 GBHL. My Wife's so proud

Free SBG fanzine: viewtopic.php?f=1&t=29569
Top
  Profile  
Reply with quote  
 Post subject: Re: Dr Grant's WIP [Thrydan Wolfsbane & captured Merry & Pip
PostPosted: Wed Jul 09, 2014 3:50 pm 
Ringwraith
Ringwraith
User avatar
Offline

Joined: Fri Aug 03, 2012 1:50 pm
Posts: 1339
I’d originally intended to write up my behind the scenes thread for my Throne of Skulls display board as a separate thread entirely but ultimately decided that it made more sense to post here within my WIP thread so A) anyone who’s already been interested in my work would see it and B) it wouldn’t vanish into the depths of The One Ring in a few weeks never to be seen again! So, here goes, a few long, pic-heavy posts coming, hope you all enjoy!

As I think I’ve already mentioned I first came up with the idea of doing a display board at Hobbit Throne of Skulls in February 2013. Sam Macguiness won Best Army with an awesome Thorin’s Company on a Goblin Town display board and it all just looked so cool that I decided I wanted to give it a go. At the doubles tournament in June 2013 I was nominated for Best Army with my all mounted Rohan, eagles and radagast force (check out page 2 of this thread for army shots) but again lost out to Sam M and his partner Paul with their awesome Helm’s Deep themed army on a really cool display base. I began to think that the key to winning Best Army was not only well painted models but a truly themed force on a really nice display base and so I decided to create such a thing for the next Throne of Skulls (which at this point I assumed would be February 2014 as usual).

But what would the theme be? At the time I was really excited about the Hobbit films and quickly settled on a Battle of the Five Armies theme which I thought would not only be cool but would allow me to collect and paint loads of the cool new Hobbit figures. At the time we had no idea about what the Desolation of Smaug releases would be so, assuming Throne of Skulls would be 1000 points again, I came up with an army of Thranduil leading 10 Mirkwood Guard, Dain leading 10 Khazad Guard, a King’s Huntsman (representing Bard) leading 10 Warriors of Rohan (Laketowners). Thorin, Gandalf, Bilbo, Gwaihir and an Eagle or something like that. Even back then I could picture the board in my head, Mirkwood would be on the left, Erebor in the middle and Laketown on the right, all assembled on one display board with a big cliff at the back spanning the width of the piece.

Fast forward to February 2014 and we had lots of cool new Hobbit miniatures but no sign of a Throne of Skulls, finally, after much worrying, the event was announced for June and I got my thinking cap back on, I was still set on the theme but in the light of the new sourcebook I had to rethink my army list, Beorn and Bard’s profiles were both more expensive than I’d thought they would be so in light of the new profiles I came up with the following army: Thranduil leading 10 Mirkwood Rangers, Bard leading 10 Laketowners, Thorin leading 10 Warriors of Erebor, Gandalf, Beorn, Bilbo. Which I thought would look awesome, be loads of fun to play with and not be entirely uncompetitive. However, one last surprise was in store as GW then announced that TOS would only be 600 points! As much as this was good for the tournament (7 600 point games is better than 5 1000 point games IMO) it meant that I had to rethink my army again (essentially dropping Gandalf and Beorn) and eventually settled on the following: Thranduil leading 9 Mirkwood Rangers, Thorin leading 8 Warriors of Erebor, Bard Leading 5 Laketowner Guard and Bilbo. This was a really nicely themed army and gave me that Battle of Five Armies theme I needed. I was also keen to include my converted Warriors of Erebor (see page 10 of this thread) as I always think converted models give you an advantage in Best Army competitions. It was a shame to lose to centrepiece models like Gandalf and Beorn but it still allowed me to carry through with my theme and so thoughts turned to the display board!

As you can see earlier in this thread I’d painted most of my army already in the last few months and so there wasn’t an awful amount of stress in terms of getting the models painted. However, the lead-up to TOS came at an incredibly stressful time of year for me. 2 months before the event I was organising and going on a stag do and then a few weeks later writing and delivering a Best Man’s speech which left very little time for hobby work, then, the month before the event I was marking a semester’s worth of student work and moving house, all of which was incredibly time consuming and stressful but I was determined to plough on through and get the board done, however stressful it might be!

Sign on the door to prevent distractions!
Image

And so I eventually got cracking on May 10th, 26 days before the event! The first thing I did was to draw it all out to scale on a few pieces of paper to check I could fit all the models on the board. I had already emailed the events team to find out the dimensions of the cabinet shelves to ensure I didn’t make the board too big but given the planned size of the cliffs, laketown house and trees I didn’t have too much space to work with. Anyway, I worked out I had just enough space to place everything by laying the models out on the plan show below

Image

The 5 circles are the 5 trees for the Mirkwood section and the L shape of thin lines on the right is the Laketown boardwalk with the Laketown house being the white space to the right of the boardwalk.

I’m going to go through each part of the project individually rather than the whole thing chronologically as I think that will make more sense to the reader.

So the first thing I got started on was the house. I was working completely from scratch with no real end-game in mind - probably quite stupid on reflection! I made up the measurements based on the space I had to put the house and then used a Laketown Guard model to get the height right. For the main structure I used foam board glued together with PVA. I used dressmaking pins to hold the foam board together while it dried and to give the building some extra stability. I really can’t recommend these enough if you’re working with foamboard, they’re dirt cheap and available in most supermarkets and really, really useful.

Image

After the foam board was dry I then glued balsa wood panels to the sides of the house to give an authentic wooden effect, ensuring that the grain was pointing horizontally. Before I glued the panels in place I scored vertical lines into the wood with a craft knife to give the impression of individual planks.

I also decided I wanted the boardwalk to be built into the house for added durability and so at this stage I built a framework for the boardwalk into the base of the house. I bought a bag of 1000 coffee stirrers on ebay very cheap ages ago and they’ve proved invaluable on a variety of modelling projects and were perfect for creating the frame and planks of the boardwalk.

The photo below shows how the framework of the house was built up, foamboard on the inside, balsa wood on the outside and the boardwalk frame glued in place.

Image

It was about this time I decided to add a second level to the house to add to the effect. This was pretty indicative of the whole project with me constantly adding to the complexity when I should really have been trying to simplify it. However, on reflection I’m really glad I did make the house double storey as it really enhanced the effect - it was just a lot of hassle at the time! Once again I didn’t really have a plan, I just started carving up more foamboard and balsa wood and gluing it on top of the lower level. I figured that if the building looked a little uneven it might actually reflect the run-down appearance of Laketown in the movies!

I also made sure that I cut holes for windows and doors into the balsa wood before I glued it onto the foamboard as I figured this would give me realistic areas to fill in as well as allowing me to glue the windows onto the foamboard. Once the basic shape of the house was constructed I then used the same coffee stirrers to create the individual slats of the boardwalk - this was a time-consuming process but I think using individual planks made for a sufficiently realistic effect that it justified the time.

Boardwalk in progress
Image

And finished
Image

Once the boardwalk and walls were dry I then glued more coffee stirrers around all the walls of the house to work as crossbeams. I had to use superglue rather than PVA for this to ensure they dried flush to the walls but after a bit of fiddly work it was completed. these decorative bars also served a duel purpose of covering up the heads of the dressmaking pins and uneven joins at the corners of the building. It worked well and made the house look vastly more authentic

For the tiles on the roof I cut long thin strips of cereal box cardboard up and marked individual tiles on them, I cut little gaps in between each tile which gave the impression of individual tiles without me going mad cutting and fixing individual tiles! Starting at the bottom I then glued each strip onto the foam board roof with PVA using 3 dressmaking pins at the top of each row to hold them in place while the glue dried, these were then covered up by the next row of tiles that were glued on top. It still took a long time to complete this process as there are about 20 rows of tiles on each side of the roof. The roof was finished by gluing small sections of a drinking straw along the top, covering up the join between the two halves and finishing off the roof nicely.

Image

Image

I then built a simple window frame in each window using matchsticks which was simple if fairly fiddly. The windows were created using wire mesh that I purchased in a craft shop, cut down to size and glued into the window gaps. This was a fairly frustrating process as the mesh was only held together by itself so as I cut it down to size the small parts of wire had a tendency to fall apart. I partly got around this by covering the mesh in superglue before cutting it up and then gluing it onto a thin cardboard backing. This then allowed me to just cut out the shape of the window from the cardboard which I found to be a more successful approach.

Image

Image

The doors were simply a small rectangle of balsa wood with some thin strips glued on top. During construction I’d also decided to make myself a balcony to add some height to the display so I then started building this up as shown in the picture below

Image

However, reflecting on the product at this stage, I decided that the supporting struts and the crossbeams on the door were all too thick so I rebuilt these areas using thinner balsa wood which I think gave a much better result.

Image

I was worried about the structural stability of a balcony supported by such thin balsa so I once more turned to my trusty dressmaking pins and inserted one down into each support, you can see the heads at the top of each support in the picture above.

I then added more supports above (again, secured with vertical dressmaking pins) and a handrail of thinner balsa wood before building the staircase out of a series of individually cut balsa planks and with that the house was complete!

Image

I painted the house using Dulux tester pots. These are available in Homebase and cost about £4 for a 250ml pot which is very affordable as well as being the perfect size for scenery paints. Best of all they do colour matching so if you’ve got a particular GW colour you want you you can just paint it onto some card and take it over and they’ll make you up a tester pot of it - great stuff!

For the main body of the house I used my tester pot of Scorched brown and then painted all the crossbeams in a dull, royal blue, mixed up to appear similar to the ones in the movie. The roof was painted in a brownish grey and that was that!

Image

I tried to mix up a wash from the Dulux paints but it didn’t work at all, the paints just aren’t made for that. So after a quick trip to GW I returned with a good few pots of Nuln Oil and liberally covered the whole building. Think it took about 2 whole pots but it was worth it and gave a fairly effective and realistic effect. I then dry-brushed the wood with my Dulux Bestial Brown replacement, the beams with a lighter blue and the roof with a lighter grey. The whole house was then drybrushed with a pale browny-grey to give it the final weathered feel which I was very happy with - and that was that, the house was done!

Image

So that’s how I built the house, I’ve decided to upload this in smaller segments to give both me and those reading a break - next up - the trees!

_________________
Finished 2nd in the 2014 GBHL. My Wife's so proud

Free SBG fanzine: viewtopic.php?f=1&t=29569
Top
  Profile  
Reply with quote  
 Post subject: Re: Dr Grant's WIP [TOS Battle of 5 Armies Display Board]
PostPosted: Wed Jul 09, 2014 4:05 pm 
Elven Elder
Elven Elder
User avatar
Offline

Joined: Mon Jul 27, 2009 5:57 pm
Posts: 2760
Location: Belgium, Aalst
that house looks great! well done!

_________________
goblin: "people associate me with boogers because i am green"
Top
  Profile  
Reply with quote  
 Post subject: Re: Dr Grant's WIP [TOS Battle of 5 Armies Display Board]
PostPosted: Wed Jul 09, 2014 4:41 pm 
Elven Elder
Elven Elder
User avatar
Offline

Joined: Thu Aug 13, 2009 6:37 am
Posts: 3499
Location: Hull UK
Images: 14
Lovely work on the house.
Nice original touches like the shakers have really made this work.

_________________
Commission Service Available

mallysminiatures.blogspot.co.uk
Top
  Profile  
Reply with quote  
 Post subject: Re: Dr Grant's WIP [TOS Battle of 5 Armies Display Board]
PostPosted: Wed Jul 09, 2014 7:13 pm 
Loremaster
Loremaster
User avatar
Offline

Joined: Tue May 07, 2013 1:11 am
Posts: 1091
Location: Massachusettes
Images: 3
The House came out fantastic, nice to see how it was built. Reading through your introduction of stress I had some thoughts though...I have given three best man speeches now (always the best man and never the groom) and I never wrote a single line down. I just winged it, got applause, was told it was great and after a few drinks nobody was the wiser or remembered the jokes I made anyway. and then as I read I get to the part about building the house and you didn't really have a plan... Amazing how opposite as I would fill a notebook before starting to even buy the first coffee stirrers.
But hey, you got through and made an awesome display board. Hope you can relax and put the stressful months behind and allow those on non-party business back in to sip a cup of tea.
great work. :yay:

_________________
http://www.sithious.webs.com
Top
  Profile  
Reply with quote  
 Post subject: Re: Dr Grant's WIP [TOS Battle of 5 Armies Display Board]
PostPosted: Wed Jul 09, 2014 8:04 pm 
Ringwraith
Ringwraith
User avatar
Offline

Joined: Tue Jul 20, 2010 2:33 pm
Posts: 2145
Location: South West England, UK
Inspiring, really movie prop material

_________________
Harfoots-The first of the Hobbit people to cross over the Misty Mountains and enter Eriador.
Top
  Profile  
Reply with quote  
 Post subject: Re: Dr Grant's WIP [TOS Battle of 5 Armies Display Board]
PostPosted: Thu Jul 10, 2014 7:51 am 
Loremaster
Loremaster
Offline

Joined: Thu Feb 09, 2012 11:01 am
Posts: 1829
Location: Lancashire
Splendid work on the house.

_________________
My Miniatures Blog (covering LOTR/Terminator/Doctor Who/Warpath and more!):
http://cruciumgiger.blogspot.co.uk/
Top
  Profile  
Reply with quote  
 Post subject: Re: Dr Grant's WIP [TOS Battle of 5 Armies Display Board]
PostPosted: Fri Jul 11, 2014 5:33 pm 
Ringwraith
Ringwraith
User avatar
Offline

Joined: Mon Jul 18, 2005 2:56 pm
Posts: 3736
Location: The Height of Nonsense
A superb house - great to see items conceived and constructed from scratch.

_________________
Published ebooks:
Instrument of the Empire
A Note of Defiance
Phantom Ships, Ghost Flotilla
More to come!
Top
  Profile  
Reply with quote  
 Post subject: Re: Dr Grant's WIP [TOS Battle of 5 Armies Display Board]
PostPosted: Sun Jul 13, 2014 10:11 pm 
Ringwraith
Ringwraith
User avatar
Offline

Joined: Fri Aug 03, 2012 1:50 pm
Posts: 1339
Ooooooooooooh I'm an Elven Loremaster - how exciting! :D

Thanks so much for all the supportive comments everyone, very much appreciated, hope you enjoy part 2!

Gandlaf the Grey wrote:
Nice original touches like the shakers have really made this work.


Sorry Gandlaf not sure what you mean? Shakers? Is that a typo?!?! Cheers for the kind words though!

@Sithious - Hah, loved the Best Man comparison! Certainly very interesting seeing the way different people work! To be fair I don't think I had the time to plan the board out! Thanks for the very kind words though, things have definitely calmed down now and I'm enjoying my hobby again! :-)

So, without further ado...

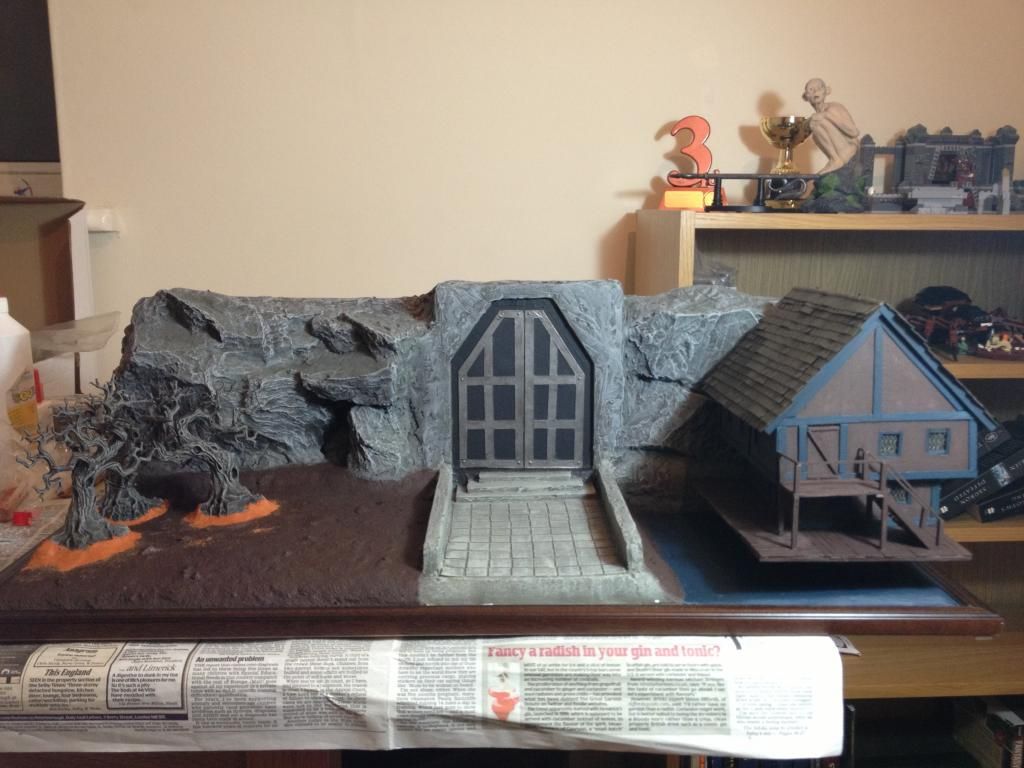
Display Board Behind the Scenes Part 2 - The Trees

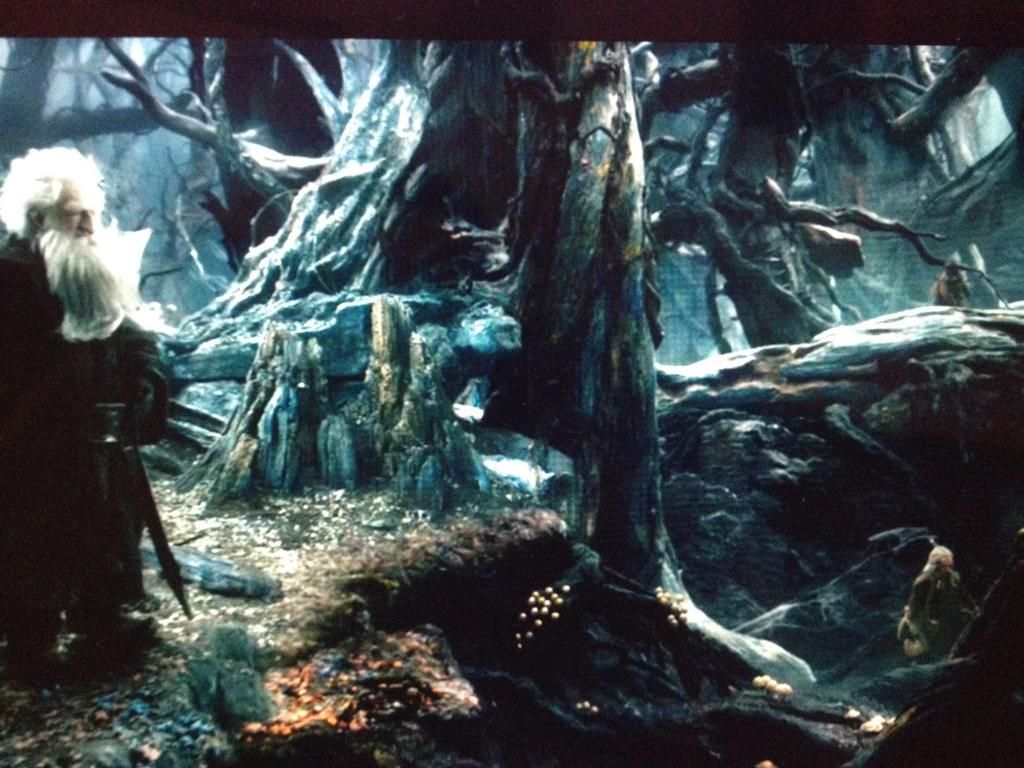
Ok, so the next stage I’ll look at is the production of the trees. I decided early on that I’d use Citadel woods for my trees, I think these work well for LOTR and the trunks are almost perfect representations of the Mirkwood boughs in the movie.

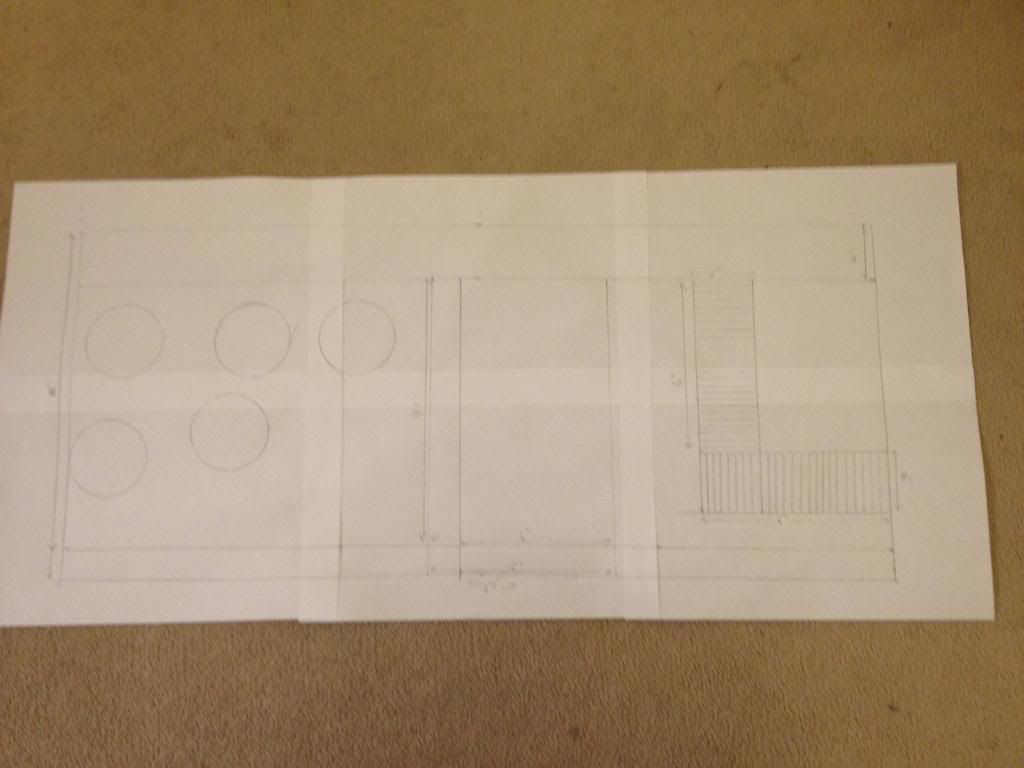
As mentioned I’d worked out that I could fit five trees in total onto my board, as shown on the plan in the previous post. Three of these would be fixed to the board but I had bigger plans for the other two. One of the unique and fun aspects of Throne of Skulls was that on the Sunday we’d be playing the Mirkwood scenarios and both Good and Evil armies could get Mirkwood Spiders to aid them in their games if they rolled for spider infested woods. This means that there was a strong incentive to have some Mirkwood Spiders with you which, given my theme, was no problem at all!

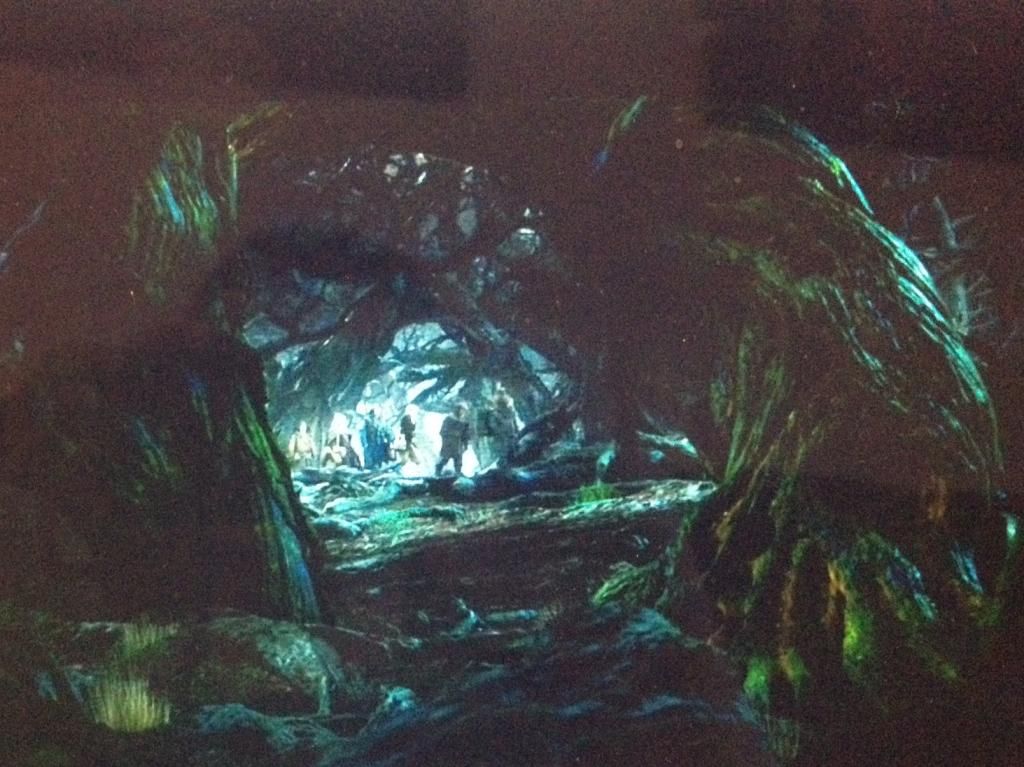
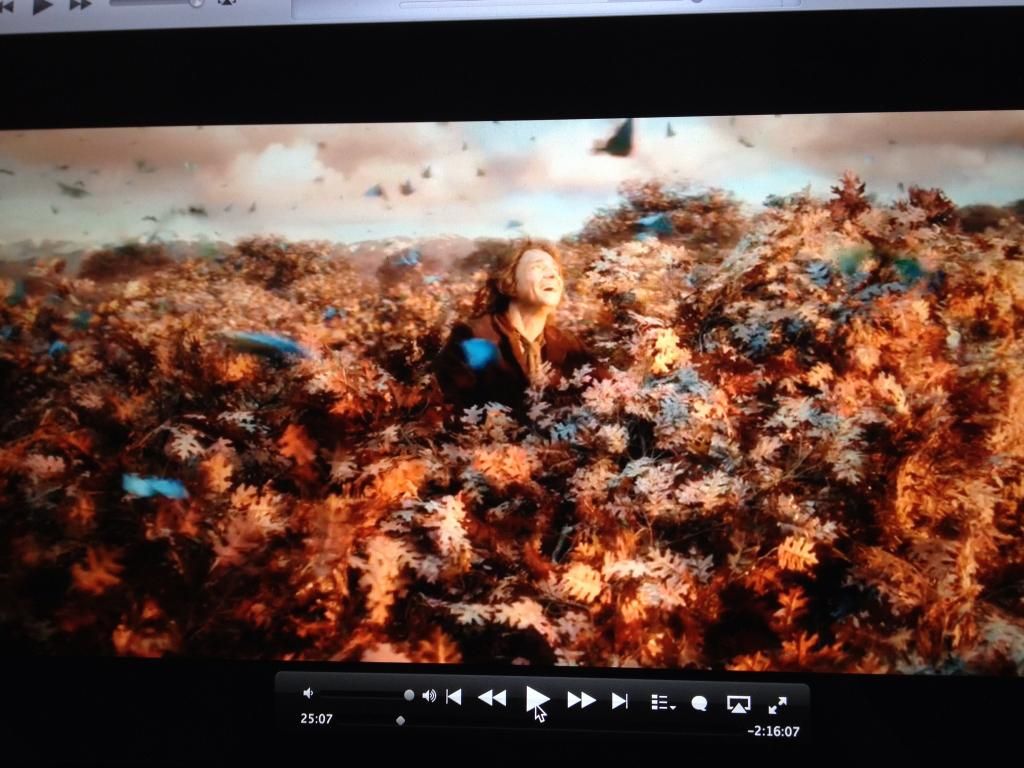
Some of you may remember my eagles I painted last year (page 2 of this thread if you’re curious) and that when I painted them I decided to put them in trees so that I didn’t have to rely on the plastic flying stems which I had never been a fan of. I was really happy with how they looked and decided to do the same sort of thing with my 2 Mirkwood Spiders, hopefully recreating the scene in the movie where the dwarves are attacked beneath the canopy of Mirkwood.

I managed to pick up 2 Citadel Woods for a total of £22 instead of the £36 retail price by using the discounts of some online stores (Element Games and Slayer Gaming) and some store credit at Element Games that I’d won for doing well at a recent tournament. Fairly pleased with the deal I set to work on the trees. My first job was to clean up all the mould lines.


Oh.

My.

God.

I don’t know if any of you have ever assembled a Citadel Wood but the sheer number of mould lines is soul-destroying. There is one, clear mould line that runs all along the trunk and along the edge of every tiny bend in the branches, of each and every part of the tree. I’m sure some people won’t bother to remove these if they’re just assembling them for woods on their tabletop but I’m a bit of a perfectionist with mould lines and, knowing that this was for a display board, I couldn’t let them through. I genuinely can’t stress how long this took me to do, it was a horrible experience (I HATE cleaning up mould lines) but, several hours of tedious work later the damn things were cleaned up and I started to assemble them. The next annoyance was that each tree comes in two parts and when you put them together there’s a very ugly gap left so I had to get to work with the miliput! All 5 trees had to be filled fairly substantially and then the two that were to have spiders in were glued to 60mm bases and the edge built up with more miliput.

Image

Image

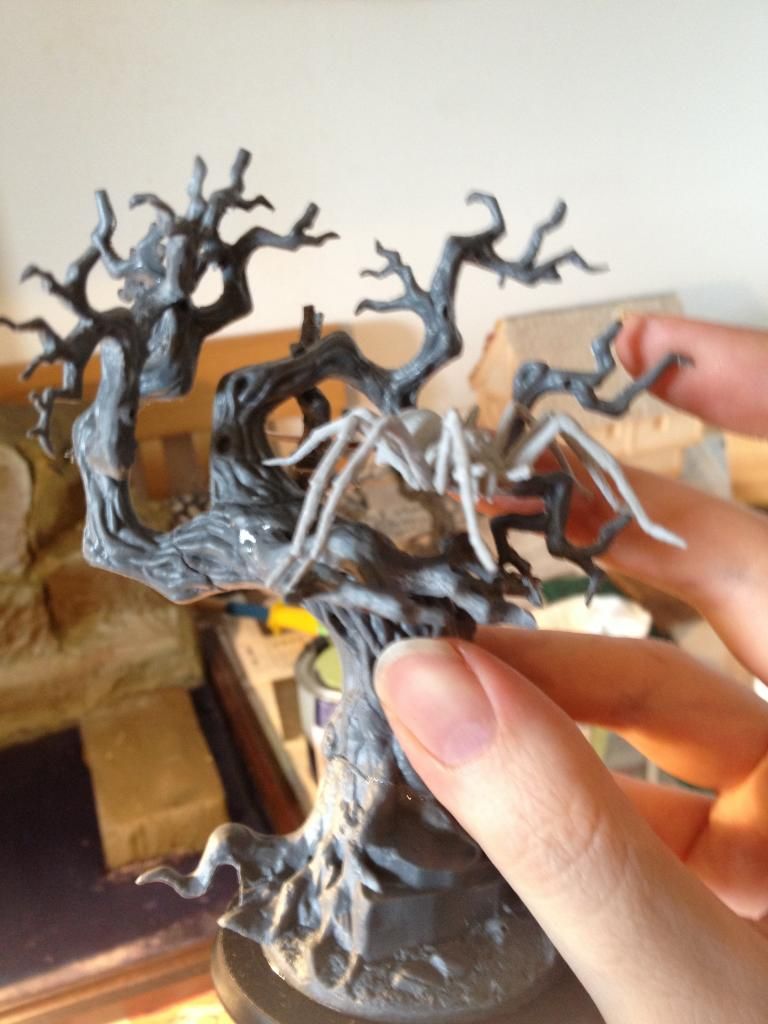
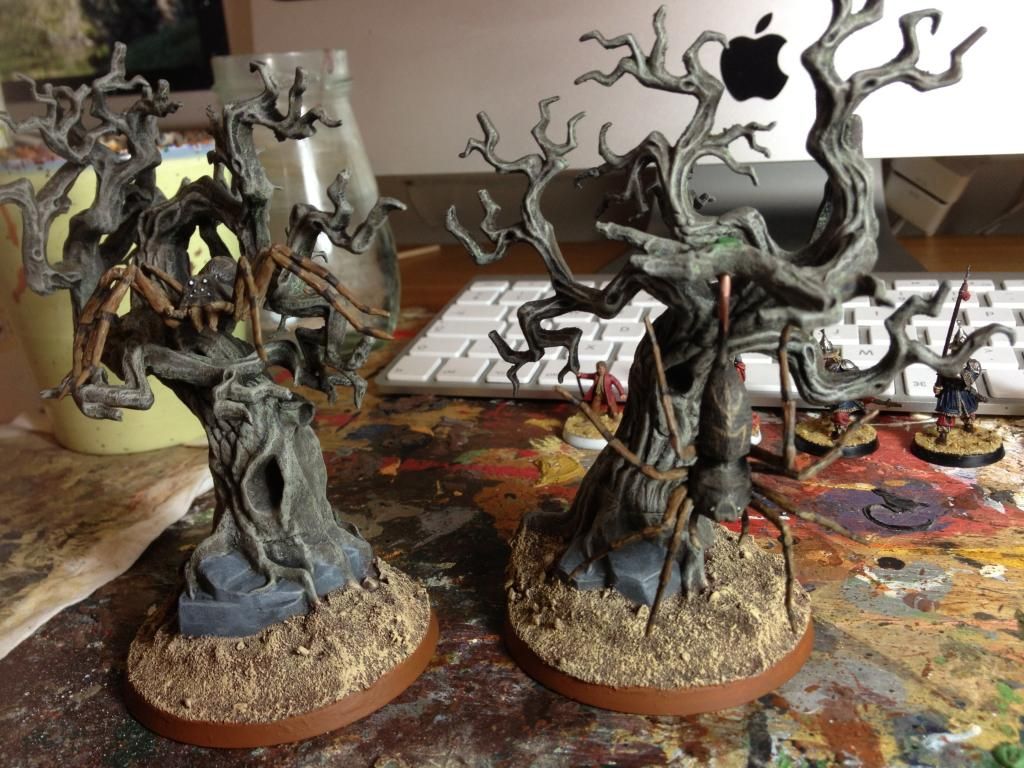
I started by working on the two trees to put the spiders in, I knew I roughly wanted one hanging down by its web and one sitting in the canopy so I started building the trees to accommodate the gribblies. Of course at this stage I needed the spiders to fit into the trees so these were quickly assembled and positioned in the trees to see how they would fit. Once I had the rough positions I then used boiling water to reshape the legs and position the spiders exactly how I wanted them. I was particularly keen to ensure that the spider sitting in the tree would have the back 6 legs balanced on branches and his body raised up, rather than taking the easy approach of just gluing the body onto the trunk of the tree. It was quite fiddly but I was eventually able to get the model looking just how I wanted it and snapped a picture of the spider’s position so I had a reference to later glue him in the tree.

Image

The second spider that I wanted to be hanging from its web had a brass rod drilled into its back. This served a duel purpose, not only would it form the basis of the web but it also gave me a handy tool to hold the spiders when painting them.

I next turned my attention to cleaning up the mould lines on the leaves.

Oh.

My.

God.

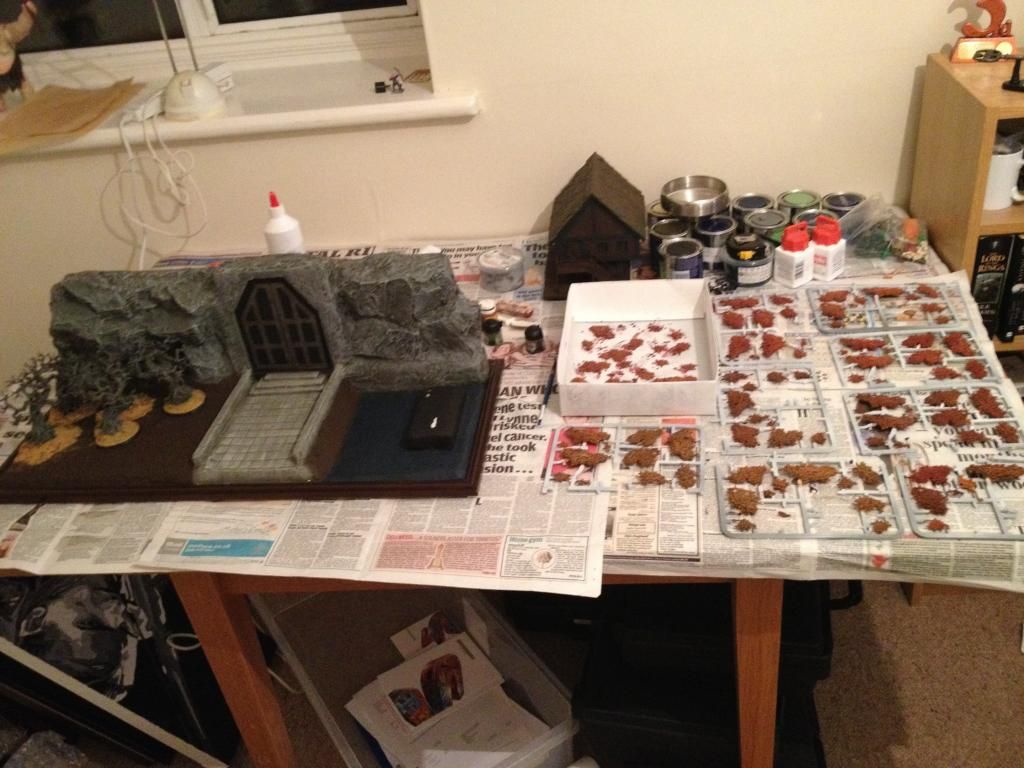
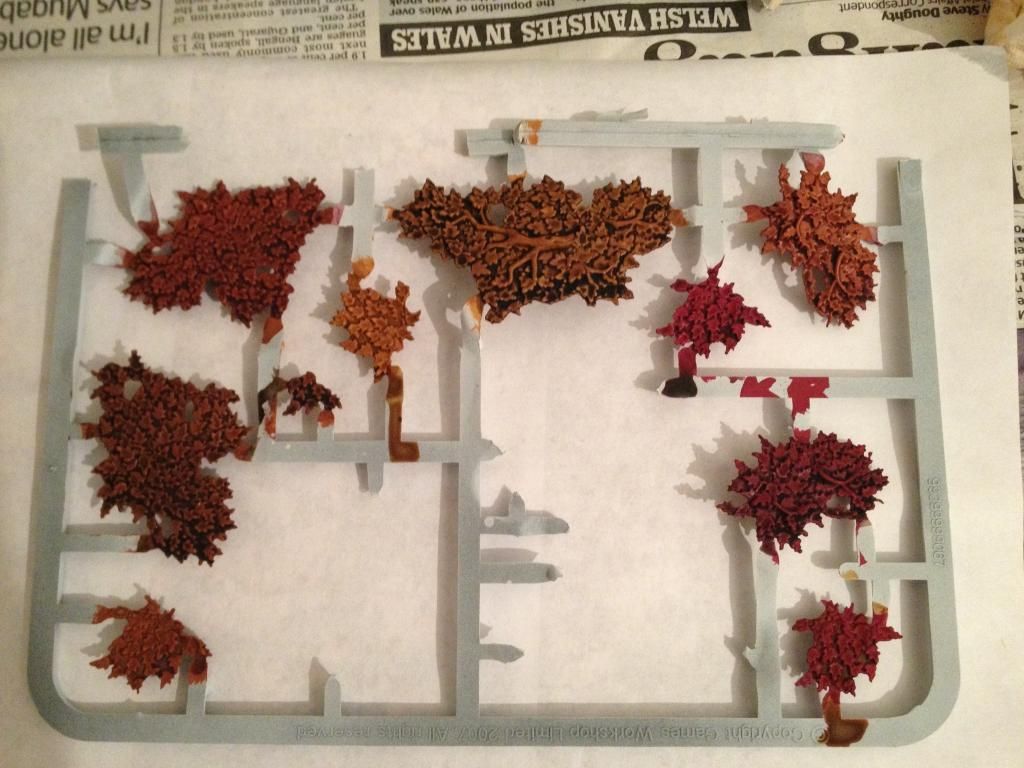
I had already decided to paint the leaves on the sprues, this seemed like the most sensible option by far. However, a close look revealed that again, there was a mould line running around the edge of each and every piece of foliage in a variety of sizes (there were about 100 pieces in total). Again, if you were purely building the wood for the tabletop then these would probably be acceptable but, given that I was making this for a display board and I hoped people would be looking at my models up close, I decided to try and get rid of as many as I could. Again, I can’t stress how tedious and frustrating this process was, it took hours and hours and hours and I hated every second of it. I’m sure I didn’t manage to remove every last bit of the mould lines but, thankfully, the leaves did look significantly better when I’d finished with them. I’m sure many people won’t see the difference or the point in spending all that time removing the mould lines but I think it’s worth putting the effort in. So, eventually, I’d cleaned up everything and assembled all the trees leaving me with this little lot (and another two sprues of leaves that aren’t here for some reason)

Image

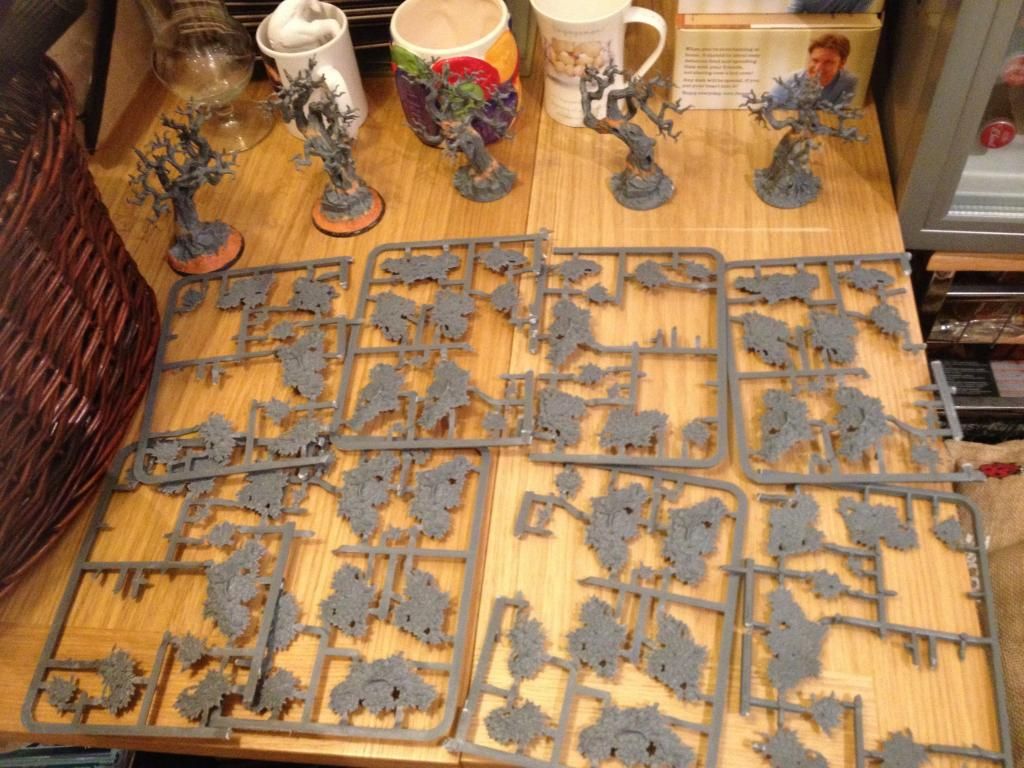
It’s also worth pointing out that I was using more leaves than are supplied in the kit, I ended up cleaning up and painting the leaves from 8 or 9 trees to go onto 5 trunks. If you only attach the leaves supplied then the trees will look rather bare, as they do on the Citadel Wood box cover, if you want them to appear fully covered then you’ll need to put on about twice as many leaves as those supplied in the kit.

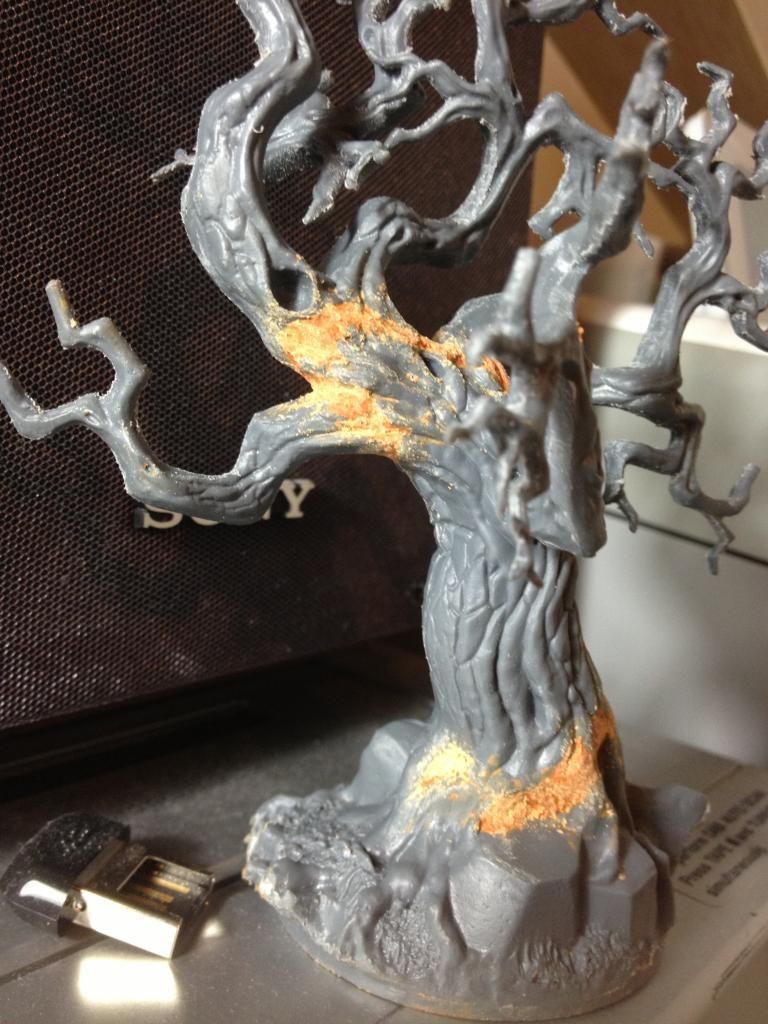
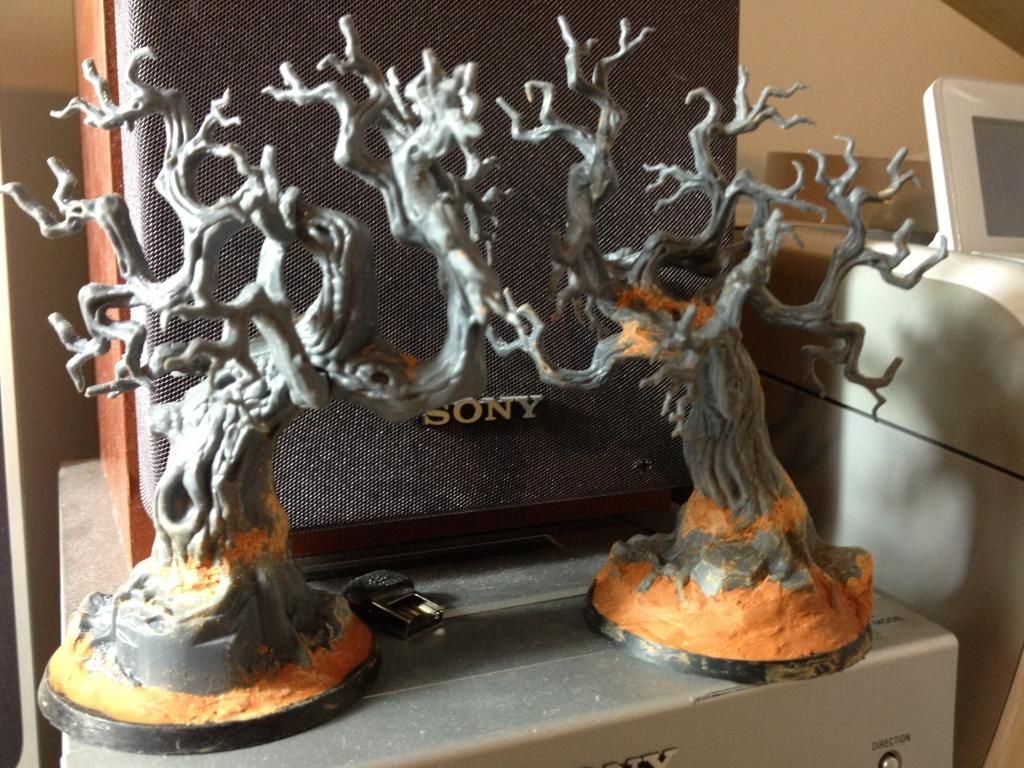
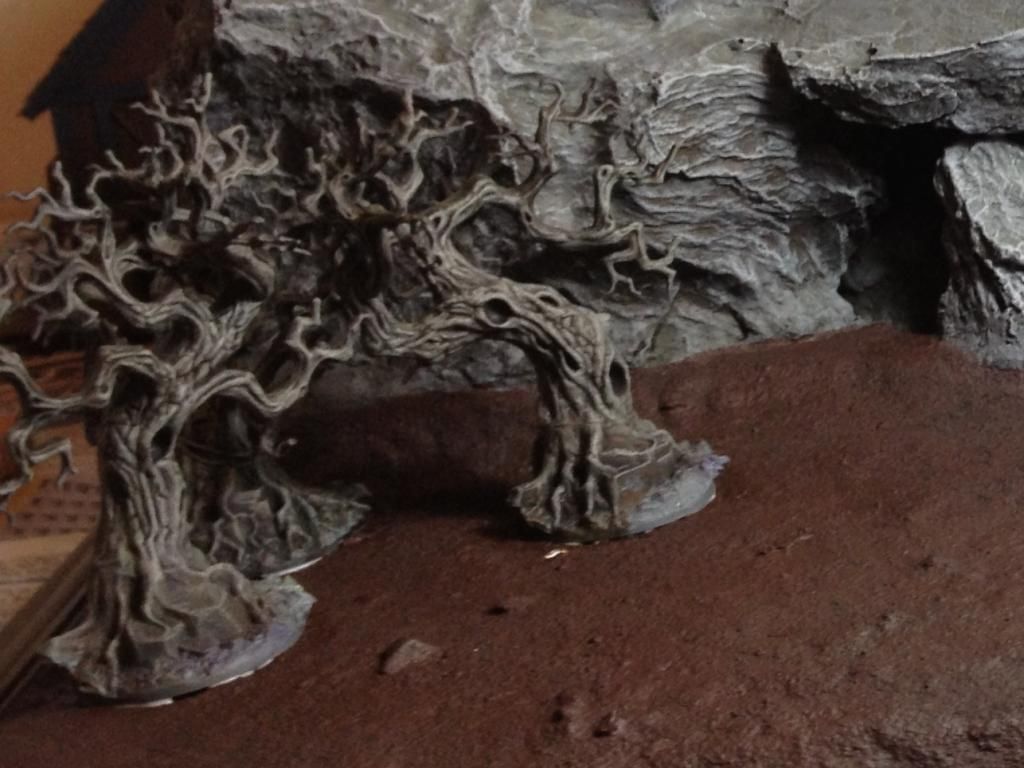
I then started painting the trunks, For the basecoats I used my Dulux tester posts again, I wouldn’t use these for most models but the plastic does take the paint well and it prevents your scenery painting costs becoming prohibitively expensive. They were base coated the same dark brown/grey as the Laketown house roof and then washed in Nuln Oil. The tree trunks of Mirkwood are equal parts vibrant and bright with lots of green and purple and dead and rotten with greys and blacks.

Image

Image

I attempted to replicate this colour scheme by first dry-brushing the trunks bright purple and bright green, this looked pretty cool but once I then dry brushed a few pale browns and greys on top most of the greens and purples were obscured. If you look closely at the trees the you can still see little glimpses of the green and purples which gives it a nice effect. However, despite most of the brighter colours being obscured, I still think it was a worthwhile process to go through as it added an extra level of depth to the colour.

Once the trunks were painted they were glued down to the display board, I needed to paint the trunks before I glued them down so I could get to every part of them without the board getting in the way. Once they were glued down I used miliput to build up the gaps at the bottom of the trees and blend them into the display base.

Image

Image

With the trunks finished I moved onto the finer details. I had painted the Mirkwood Spiders by this point and so glued these into the 2 independent trees. One was glued onto the branches as planned whilst the other (with the brass rod web) was fixed in place by drilling into one of the branches and then covering the brass rod in liquid greenstuff to simulate the web.

Image

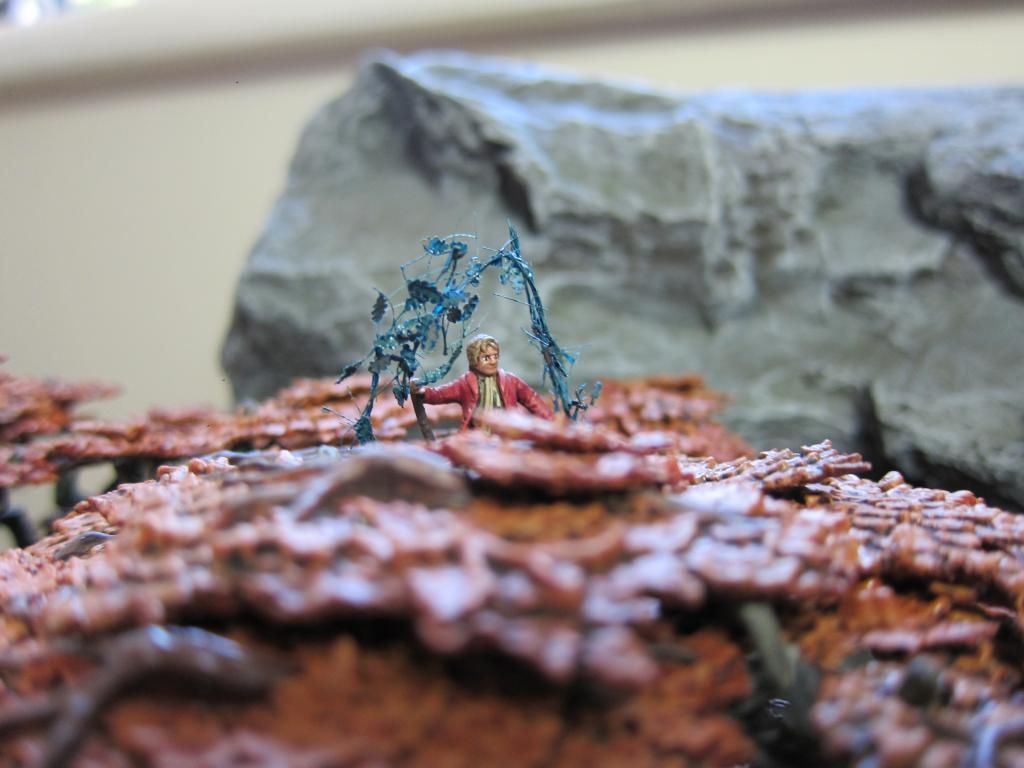
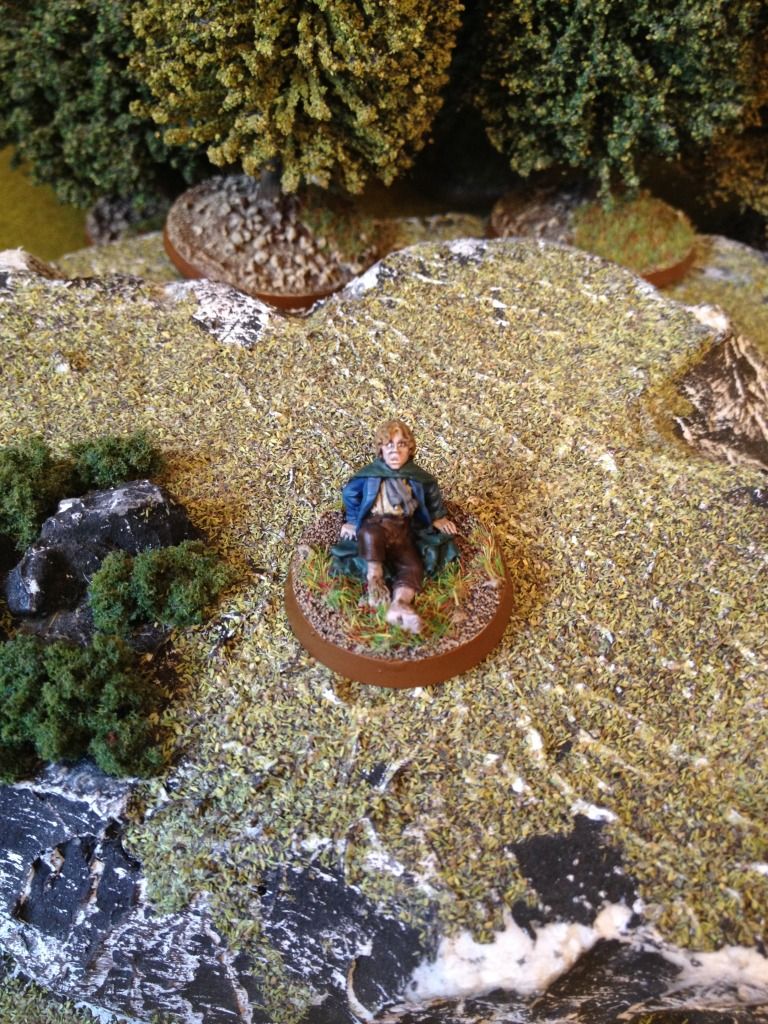
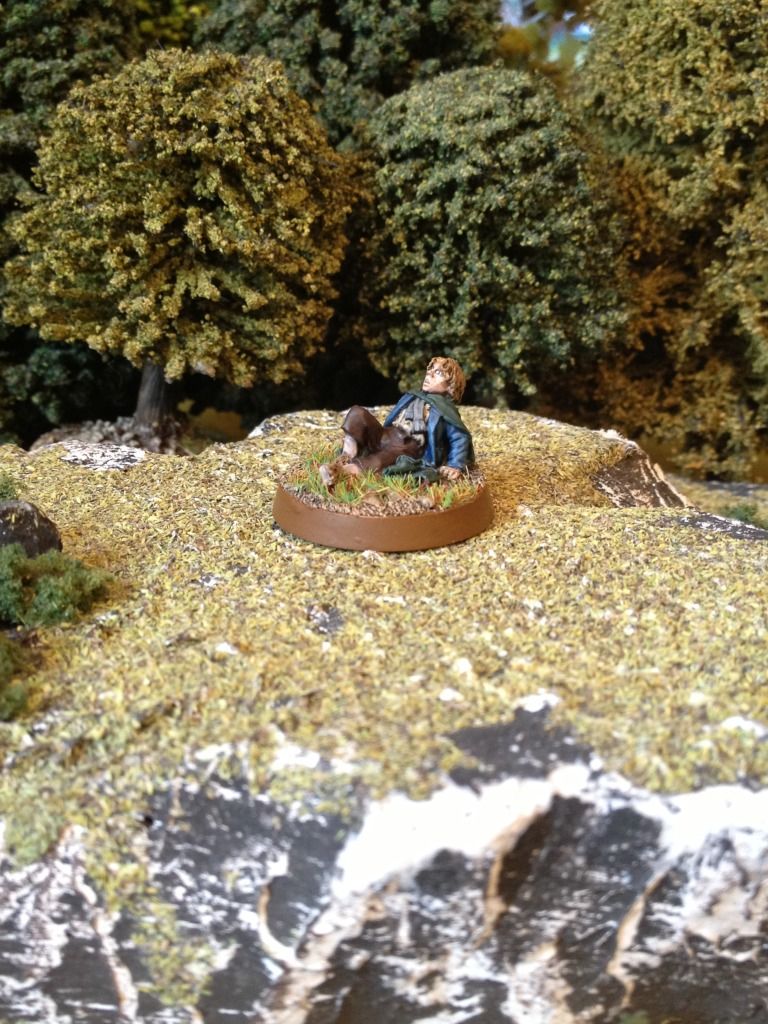
So with the trunks finished and in place I moved onto the leaves. I’d already decided to paint them in an autumnal scheme as I’d decided to place Bilbo at the top of one tree poking his head out like he does in the movie.

Image

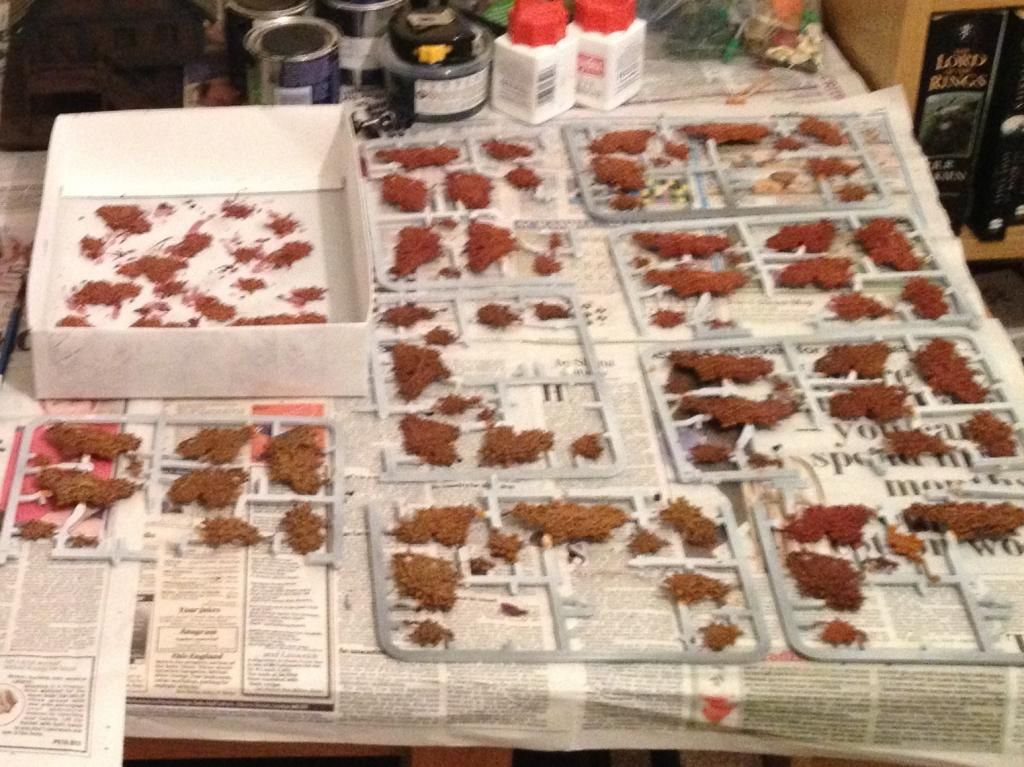
I sprayed all the leaf sprues white and then tested out a few different colour schemes, on one sprue I experimented with base coats of Vermin Fur, Deathclaw Brown and Vomit Brown, each washed with Agrax Earthshade, Seraphim Sepia and Carroburg Crimson for a total of 9 different looks (apologies for the combination of new and old paint names).

Image

Once these had dried I decided on four colour schemes, I painted half of the leaves Vermin Fur and half Deathclaw Brown, I then washed half of each base colour with Agrax Earthshade and half with Carroburg Crimson for a total of 4 different base colours.

Image

Image

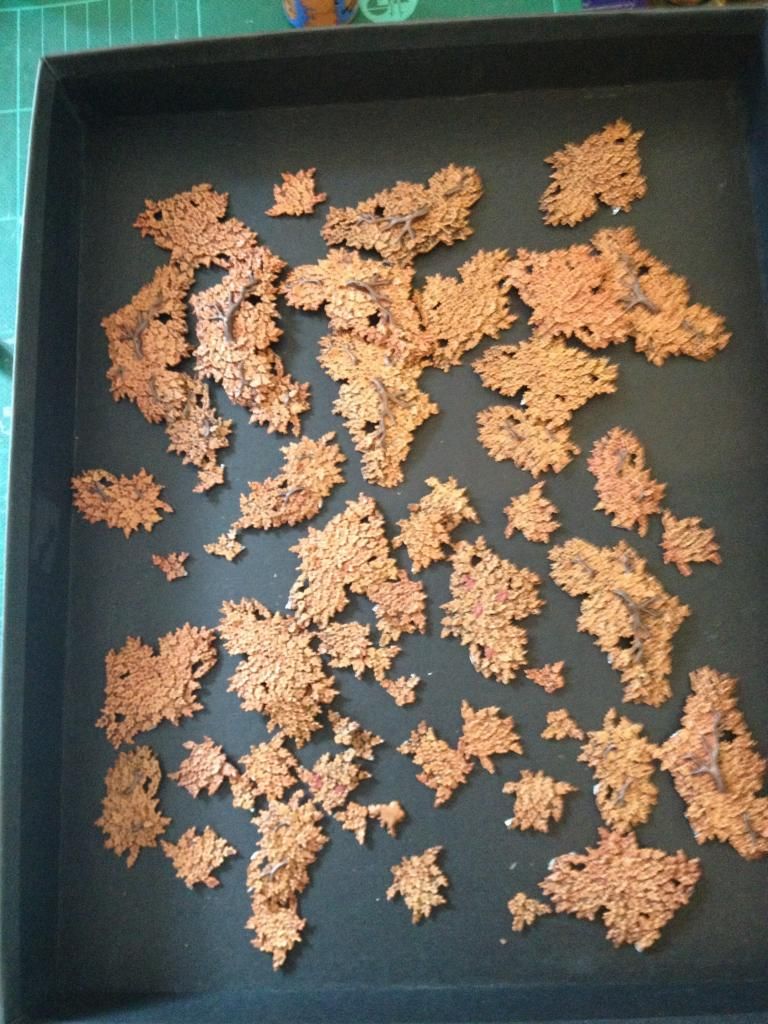
All of the leaves were then dry brushed with Vermin Fur, Deathclaw Brown and Vomit Brown before the branches on the leaves were picked out in Scorched Brown and Gorthor Brown. At this stage I must give a word of thanks to my wife who came in at the eleventh hour (I was painting the leaves on the Wednesday night before heading off to Throne of Skulls on Friday morning!) and helped me paint the branches. I liked the idea of making the branches at the top (where the sun would reach them) look brown and healthy in contrast to the grey and rotten branches beneath the canopy, I’m not sure how many people would have noticed that but I was pleased with the effect. It’s fair to say that having dry brushed all of the leaves with the same colours they ended up looking very similar and the variance of the 4 difference base colours was largely lost. However, again I feel that a subtle variance did survive and remains in the finished piece. So, with the leaves completed I removed them from their sprues and so was left wit the last, rather tedious. piece of painting work, touching up the 3 places on each piece where they had been attached to the sprue with Deathclaw Brown.

Image

So, with all the painting finished I started to assemble the leaves on the tree trunks. I had heard absolute horror stories about how hard this would be from various forums and Youtube videos thanks to the small contact points of the leaves and trunks and I have to say I was pleasantly surprised. It was certainly an incredibly fiddly process but it wasn’t too frustrating and was actually quite satisfying trying to build up the full shapes of the trees. I began with the two spider trees as they would be independent game pieces and so needed to look good from all angles. Once these were completed I began work on the three trees on the display board, I glued the leaves onto these three trees with the other two spider trees in position on the board. I did this deliberately to ensure that I didn’t glue leaves onto the board trees where I would later need to place the spider trees. This worked well and effectively created a hole in the canopy to slide the two spider trees into. The rest of the leaves were then glued onto the three tree trunks in one big mass, I deliberately assembled them as one big canopy rather than three individual trees to add to the effect of an intertwining, thick canopy and I think it worked really well.

Image

Image
Birds Eye view - note semi-circular hole on right to allow spider tree to slot in

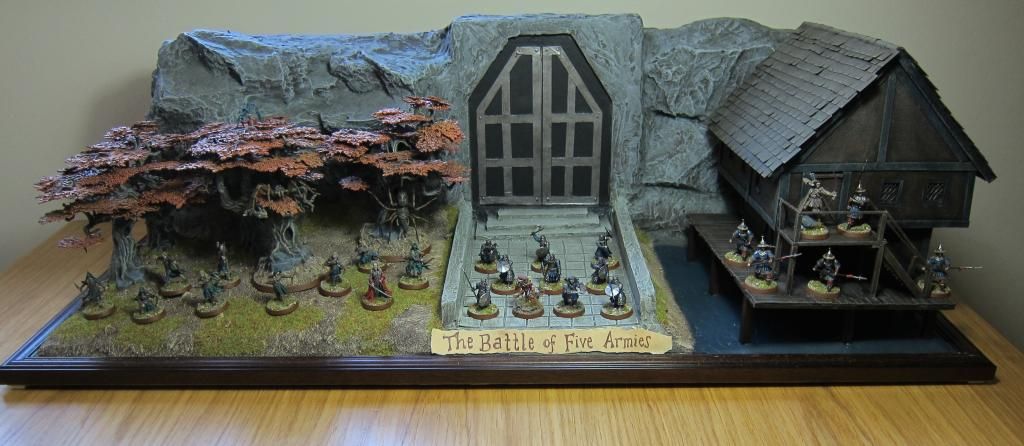
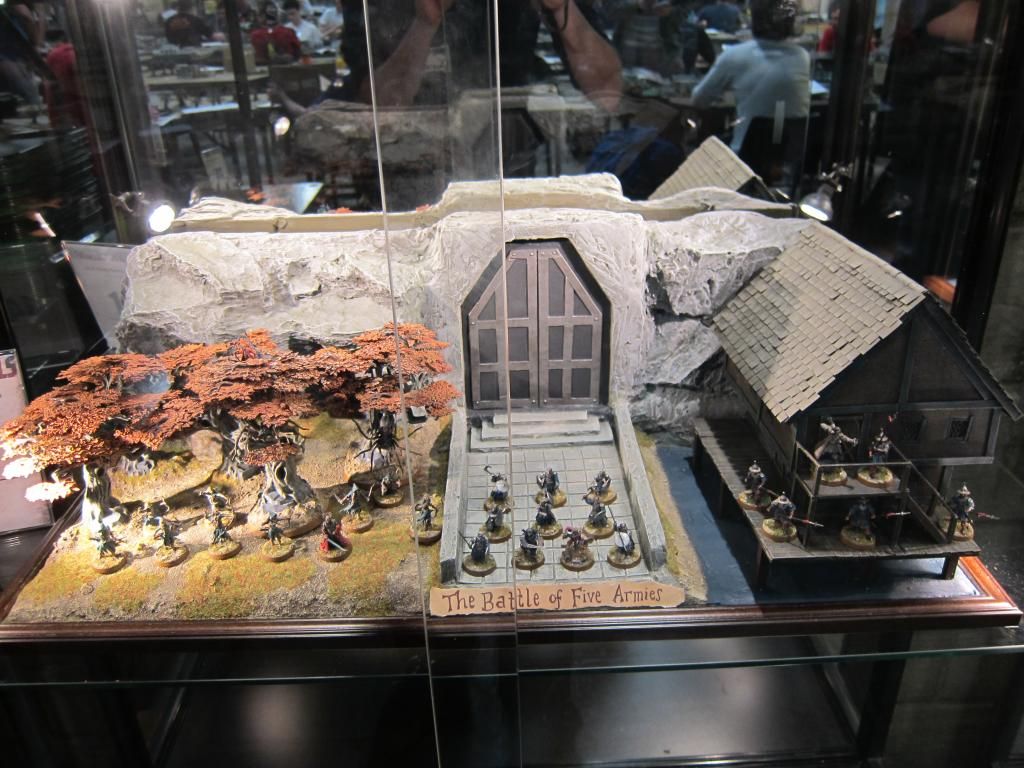
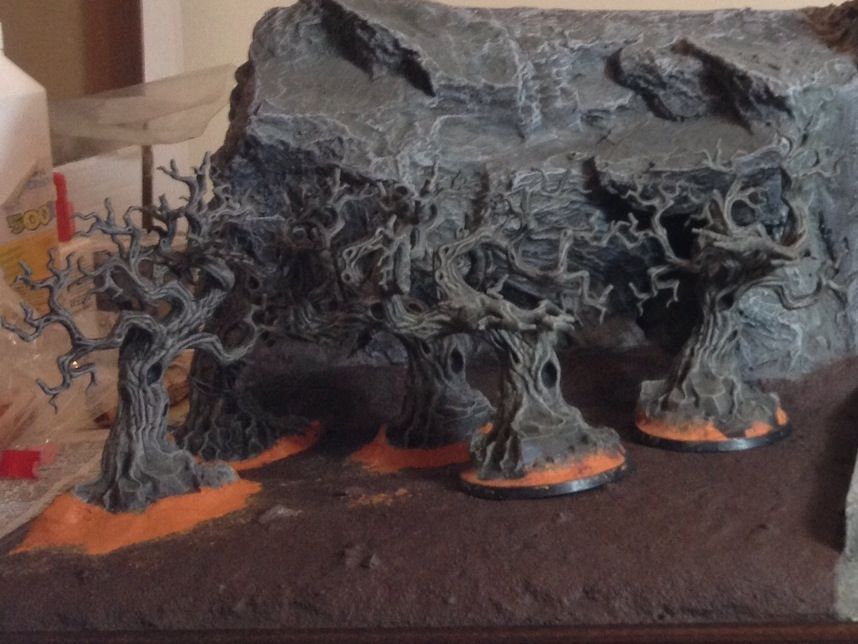
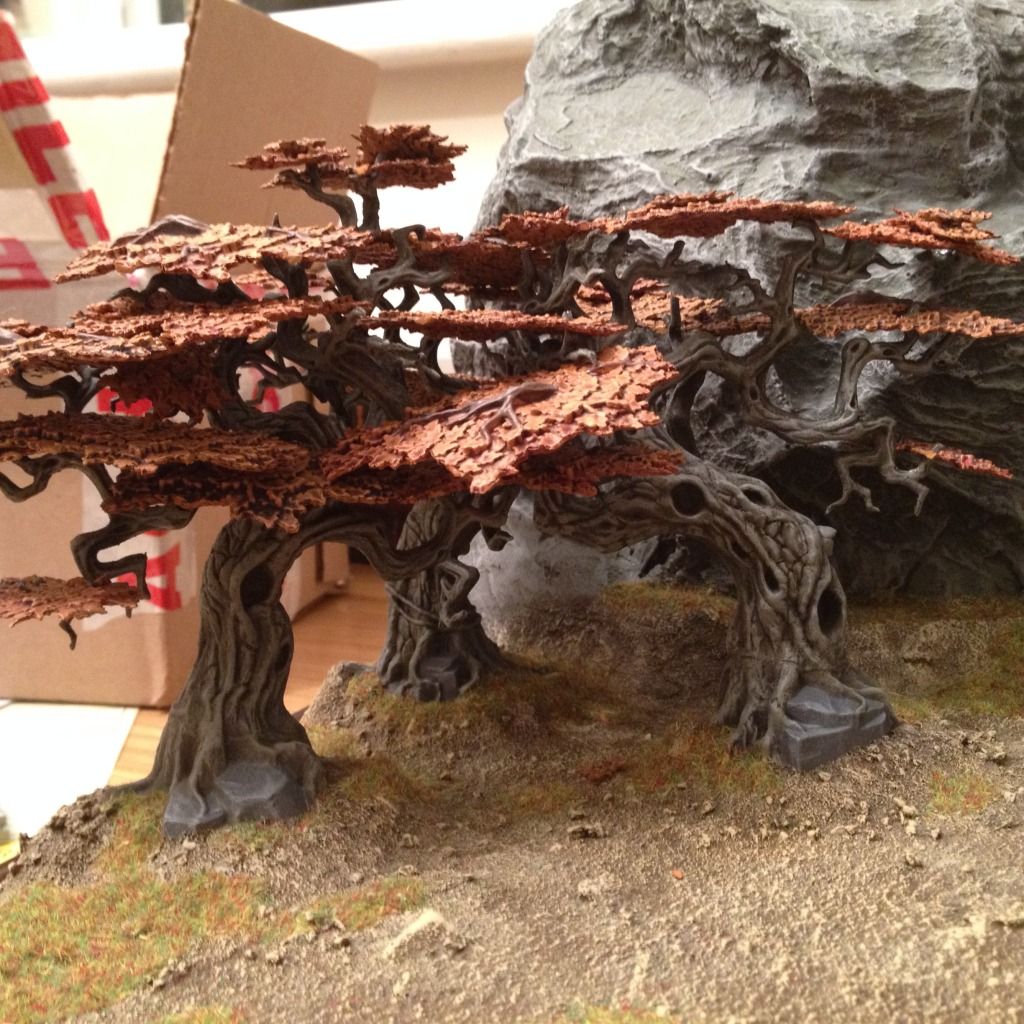
And that was that really, the leaves were in place and I slotted my canopy Bilbo (see page 11 of this thread) into the nest I had created for him in one of the spider trees. I must admit that I was really pleased with how the finished trees look, I think the colour scheme is a good replica of the scene from the movie and I think the 5 trees together made a good looking forest. I think it’s worth reiterating my point about how many leaves you need though; as I said I used the leaves from 8 or 9 trees (in terms of what you’re given in the Citadel Wood kit) for 5 tree trunks and I only covered about two thirds of three of those (to allow the spider trees space to slot in) to give the impression of a thick canopy and I think, should you want to create an authentic looking wood then you will comfortably need twice as many leaves as you get given in the kit. I really like the effect that the Citadel Wood creates but I must admit I will be in absolutely no hurry to assemble another one, I’m still having nightmares about all those mould lines…

Image
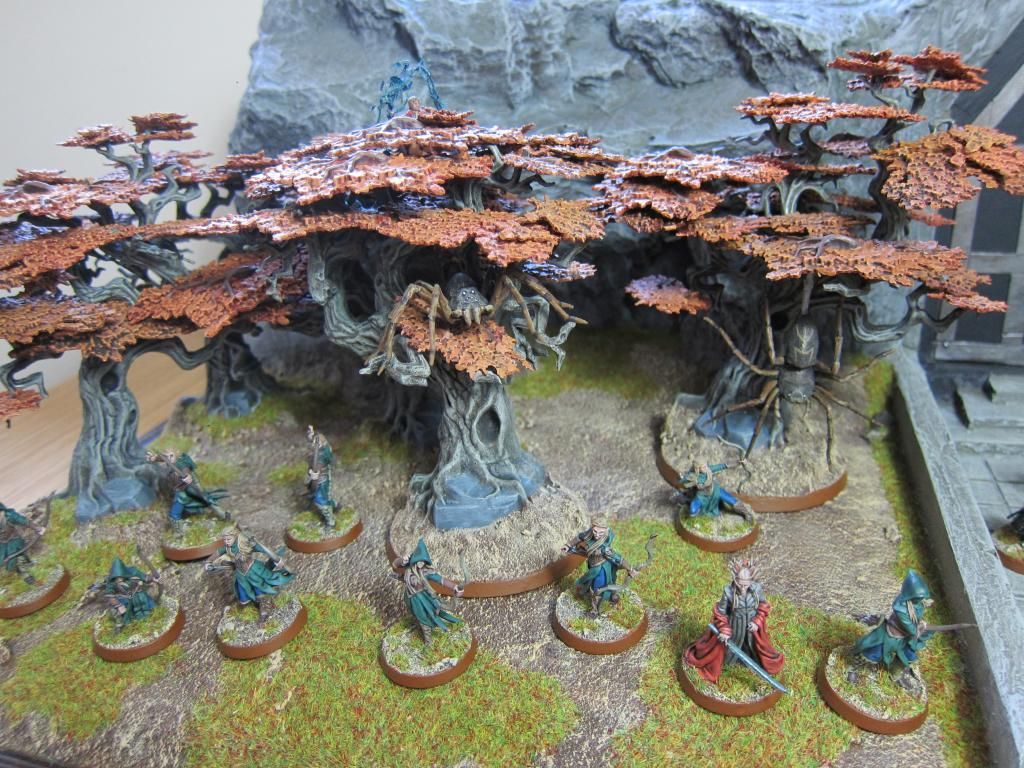
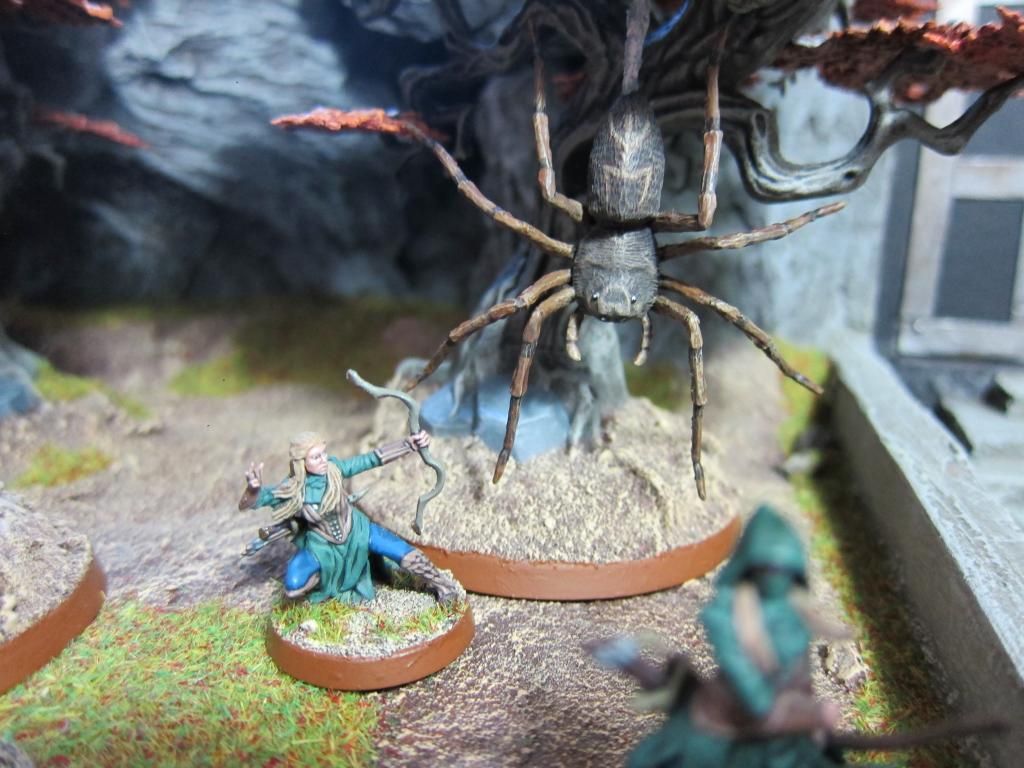
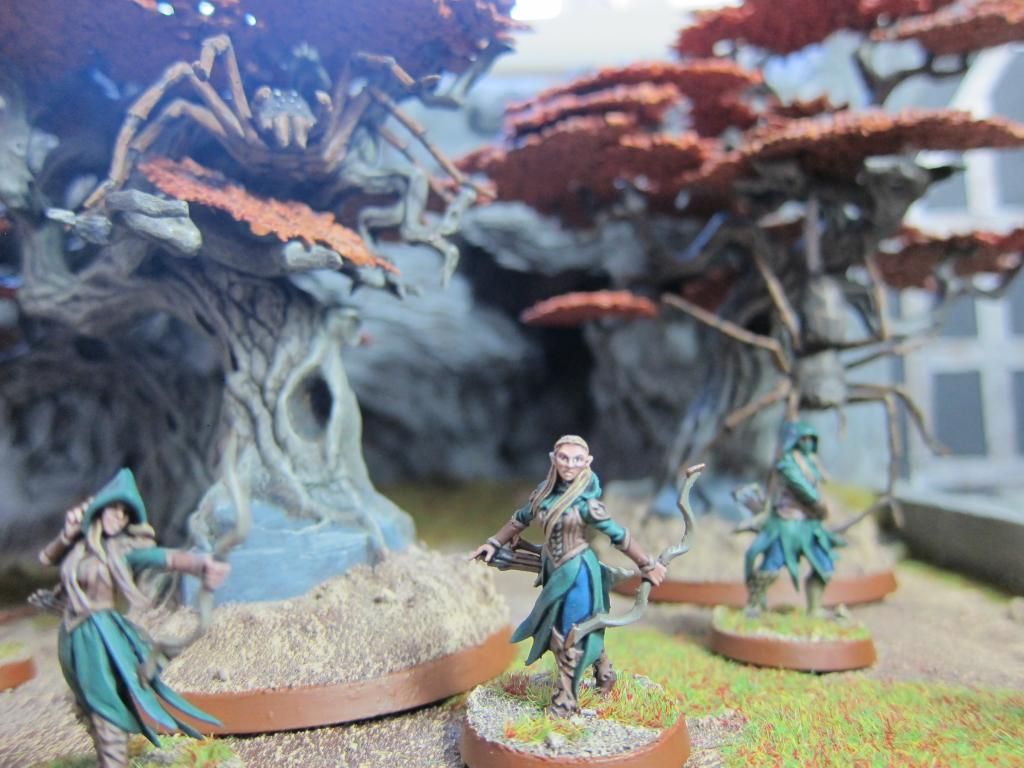
The finished Mirkwood section and its guardians

So that’s the story behind the trees on my display board, hope you enjoyed it and that you’re all looking forward to the final part where I’ll go through the construction of the board itself.

Until next time!

_________________
Finished 2nd in the 2014 GBHL. My Wife's so proud

Free SBG fanzine: viewtopic.php?f=1&t=29569
Top
  Profile  
Reply with quote  
 Post subject: Re: Dr Grant's WIP [TOS Battle of 5 Armies Display Board]
PostPosted: Mon Jul 14, 2014 7:27 am 
Elven Warrior
Elven Warrior
User avatar
Offline

Joined: Fri Jun 25, 2010 11:38 am
Posts: 555
Location: Hull, UK
Love the trees and dedication to the project. I just painted up a set of them and the mold lines are awful.

I noticed in the video on GBHL you mentioned you asked the events team the dimensions of the cabinet, would you be so kind to share those with us? ;) I like the idea of a display board that fits in the cabinet :)

_________________
++ THE VANUS TEMPLE ++
Contact for commissions!
Top
  Profile  
Reply with quote  
 Post subject: Re: Dr Grant's WIP [TOS Battle of 5 Armies Display Board]
PostPosted: Tue Jul 29, 2014 10:57 pm 
Ringwraith
Ringwraith
User avatar
Offline

Joined: Fri Aug 03, 2012 1:50 pm
Posts: 1339
Thanks for the kind words Dezartfox - it means a lot! No problems about the display board dimensions, from the events team:

“36 inches long, 13.5 inches deep, 20 inches high  (our tallest shelf- most shelves smaller than this)”

Display board Behind the Scenes Part 3 - The Board

And so to the main board itself!

As mentioned above I had already emailed the events team to discover the dimensions of the cabinet and so, scale drawing in hand, I scuttled off to my local picture framing shop to have a custom base made. After having a peruse of the various frame edges I picked one I liked and , about a week later, I had my display base! This was certainly a bit of an extravagance (the base cost about £40) but given how much time and effort I planned to put in I thought the project would justify it.

Image

With the base in hand I knew my dimensions for sure and so got messy with some foam. I chose to build the majority of the ground areas out of a material called Celotex which is readily available in UK DIY stores (I got mine in Wickes).

Image

This was the first project on which I’d worked with this material and I was very pleasantly surprised. It’s essentially like a thick foam that can be easily sawed, carved and sanded into shape without too much hassle - it makes a horrific mess though so be sure to work with it outdoors! So, I set to with a saw and a sander and eventually carved one piece of Celotex into the shape you can see here - a raised area for Mirkwood, a recessed gap into which to build the dwarven road and a low area to form the lake.

Image

Once the base-foam was done I glued it to the display base using Copydex. I normally use PVA for gluing scenery but I find Copydex makes a much stronger bond when necessary. With the foam glued onto the base, I then started working on the cliff face, I began by gluing a long block of Celotex along the length of the base so I had a solid foundation to build up from.

The next step involved taking an a large, plastic Aquarium rock formation I had bought from a garden centre and cutting it in half (sadly I forgot to take a picture to show the original ornament). This then gave me 2 largish rock formations with a roughly flat back on each. I created a back for the board out of balsa wood before gluing the aquarium rock to the backboard and the bottom foam block with Copydex. As this was drying I also glued lots more small blocks of Celotex into all the gaps around the aquarium rock to build up the rock face.

I also built the Dwarven road at this stage which was very simple to do. I glued a large flat piece of foam board into the recessed area in the base foam that I’d sanded away. The walls were two long thin strips of foam board glued back to back and the steps were simply three successively smaller rectangles glued on top of each other. All of these pieces were held down with my trusty dressmaking pins while they dried to ensure they finished flush. Finally, I glued a large Celotex block onto the balsa wood backing board that would form the back of the Erebor gates. I also glued a block of foam onto the lake section of the board for me to eventually glue the Laketown house on to ensure it had adequate support.

Image

Incidentally the picture above shows one of 3 houses in which this board was worked on! All the messy stuff sanding the foam was done here in my parents garage/garden because, at the time, myself and my wife were living in a two-bed flat and just literally didn’t have the space! Big thanks to them for letting me make a mess of their garden, couldn’t have finished the project without them!

I next set to work on building the Erebor Gates. I must admit that, whilst I knew I wanted/needed the dwarven gates, this was the part of the project I was least excited/inspired by. They were fairly easy to build out of seven pieces of foam board (I wanted each gate and the frame to be a separate piece to give an authentic idea of gates that ‘could’ open.

Image

Once these pieces were completed I glued them together to construct the whole gate section

Image

With the gate section in place I glued it into place against the large block above the dwarven road and built up the joins with more pieces of Celotex. Once this whole section was thoroughly dry I went at it with some sandpaper to smooth out the lumps of Celotex into a far smoother and more organic shape.

Image

And with that the construction was complete, next up I completed the ‘magic’ stage whereby I covered the whole damn thing in Polyfiller. This tied all the various materials together and made the whole structure start to look how it did in my head - HUZAAH!

Image
Knackered old Heroquest model included for scale!

The next stage was also one of the most terrifying - texturing the base! I knew I needed to glue sand down for the ‘land’ parts of the base and just had to cross everything and hope that it had all dried solid! So it was that with trembling hands I picked up the base and tipped it over and was relieved to find that it all felt fairly solid - HUZAAH! So, I coated the Mirkwood section and the riverbank in PVA and poured over a mix of sand and small rocks, broadly leaving 3 smooth circles in which I could glue the three citadel trees that would be fixed to the base.

Image
Note the house isn’t glued in place here

Next I created paving slabs for the dwarven road simply by cutting up a cereal box and gluing the squares down with PVA. I used the same cereal packet to glue the struts onto the Erebor gates to give them a bit of texture; as I said above I wasn’t particularly enthused by the design of the gates but I was running out of time and I think the struts are decent enough to do the job.

Image

Image

It was at this stage that I started painting the board, again with my trusty Dulux tester pots. The cliffs were base coated with my go-to brown-grey colour (the same one I used for the base coat of the tress and the Laketown house roof), all the ground areas were painted with my Scorched Brown equivalent while the lake was painted blue.

You can see my workstation below, by this point the board had made it back to our flat (the second house the board was worked on!) and I was set up on the dining room permanently for a week or two. I must say a special thanks to my wife for being remarkably understanding this time, particularly considering we were in the process of moving house! It’s interesting now to look back on this photo and see the order in which I did everything; as you can see the board is constructed with painting underway whilst the paint jobs on the house and trees aren’t even underway yet and you can just about see my freshly assembled Mirkwood Spiders on the base on the far left.

Image

The painting then continued apace with the cliffs having some dark green worked into the recesses before a succession of dry-brushes of lighter and lighter greys.

It was at this stage of the process that we actually moved house. Now, as anyone who has ever gone through this hideous process will tell you, it’s an incredibly stressful experience and it doesn’t leave too much time for hobbying and blogging! From roughly the 28th May to the 1st June I had very little time to document the process although I was able to do a bit of painting here and there.

And so we rejoin the process in my new house (and the third and final place that I worked on the board) in my brand new dedicated games room where I could set the whole thing up permanently and not have to worry about clearing the dining table if we have friends over - HUZAAH! As you can see the painting had now come on a long way. The cliffs are finished, the dwarf road was painted in a similar manner working up from a base of a light grey/green. The dwarf gates were painted with more finesse and the bars were painted in citadel Chainmail and washed with Nuln Oil. In this picture the trees were being glued down to allow me to paint the ground section.

Image

As I described above the bottoms of the trees were then blended into the base with Milliput before being textured over in the same way as the rest of the base

Image

Here’s the third workstation I has set up in my shiny new games room. This was taken on the Wednesday night and I was leaving for Throne of Skulls on the Friday morning - still some way to go!

Image

The painting of the base was completed in the same way that I paint my model bases to ensure that the models blended in. Starting from the Scorched Brown base-coat I dry-brushed up coats of Bestial Brown and Ushabti Bone.

Image

And that was largely that for the base, I spent most of Thursday finishing off the last few models, assembling the leaves on the trees and finishing the house. The house was then glued onto the base and I cut some balsa wood struts to length and placed them between the lake and the boardwalk to give the impression that they were holding up the house rather than the big block of Celotex. The final touches were to glue patches of Scorched Grass all over the ground areas and attach the Battle of Five Armies banner that my wife had kindly created for me and then, at 3:30am on the morning that I was driving to Throne of Skulls - I was finished!

Image

So, I packed the whole thing up and off we went! We had an absolutely brilliant weekend at Warhammer World and I was delighted when I was nominated for Best Army on the Sunday morning. I placed the board in the cabinet for voting over the lunch break on Sunday and was pleased to see that all my careful measuring had paid off and the display board fit inside the cabinet - just! Nick and Simon from the WW staff had to take the glass door off the cabinet to slide it in! I must say a massive thanks to them and the rest of the team at Warhammer World for being so accommodating over the weekend, allowing me to leave my board at the venue on both nights to save me having to cart it back to the hotel on both nights.

Image
The board on display for voting over Sunday lunchtime at Warhammer World

And so, as I revealed last month earlier in the thread I am delighted to say that all the effort paid off and I managed to win Best Army! This was a massively humbling achievement given the quality of the opposition and I’d like to say thanks again to everyone who voted for me, it’s really did mean the world to me and it’s probably my all-time hobby highlight. Also, I won this rather gorgeous trophy!

Image

Overall I was and I remain very proud of the project, in total it took 26 days to complete which I find quite remarkable, it certainly felt a lot longer. It was equal parts fun and soul-crushingly boring but I think the final product was well worth the time and effort. Given the time again I’d like to spend more time/effort on the dwarven gates and I would like to do more with the lake, adding some water effects/varnish/depth rather than the plain blue base - still overall I think it wasn’t too bad for 26 days work!

I hope you’ve enjoyed this rather in depth account of the production of the display board, it’s been fun to write up and nice to have it documented for the future. I’ll leave you with some more shots of the finished piece.

Now, what to do for next year…

Image

Image

Image

Image

Image

Image

Image

Image

_________________
Finished 2nd in the 2014 GBHL. My Wife's so proud

Free SBG fanzine: viewtopic.php?f=1&t=29569
Top
  Profile  
Reply with quote  
 Post subject: Re: Dr Grant's WIP [TOS Battle of 5 Armies Display Board]
PostPosted: Wed Jul 30, 2014 12:19 am 
Elven Elder
Elven Elder
User avatar
Offline

Joined: Thu Apr 01, 2010 11:33 pm
Posts: 3688
Location: Atlanta GA. U.S.A.
Images: 14
I enjoyed the photos.

_________________
"the same as a duck you must be made of wood"
Top
  Profile  
Reply with quote  
 Post subject: Re: Dr Grant's WIP [TOS Battle of 5 Armies Display Board]
PostPosted: Wed Jul 30, 2014 2:29 am 
Elven Elder
Elven Elder
Offline

Joined: Thu Dec 20, 2012 12:18 pm
Posts: 2528
Location: Dallas, Texas
The display board looks incredible. I've only begun to dabble in terrain making and toss is quite inspirational

_________________
Commission Painting @FB http://www.facebook.com/squyrepainting
Commission Customers include:
GBHL Youtube Channel
MiniWargaming
Top
  Profile  
Reply with quote  
 Post subject: Re: Dr Grant's WIP [TOS Battle of 5 Armies Display Board]
PostPosted: Wed Jul 30, 2014 2:35 am 
Loremaster
Loremaster
User avatar
Offline

Joined: Tue May 07, 2013 1:11 am
Posts: 1091
Location: Massachusettes
Images: 3
Thanks for the blow by blow of how you made this. Sorry about the leaves, but in the end, if you didn't remove the flash it would eat at your mind and you would keep thinking about it. So it is best that you spent the hours on it. I think the Lake Town Guard in the last picture says it all. Just jaw dropping fantastic to look at all finished.

_________________
http://www.sithious.webs.com
Top
  Profile  
Reply with quote  
 Post subject: Re: Dr Grant's WIP [TOS Battle of 5 Armies Display Board]
PostPosted: Wed Jul 30, 2014 7:26 am 
Elven Elder
Elven Elder
User avatar
Offline

Joined: Thu Aug 13, 2009 6:37 am
Posts: 3499
Location: Hull UK
Images: 14
Congratulations on your reward.
Isn't it funny how the final piece can never justify how much work has gone into it. I am impressed with what you have done with this display and it loos great in the cabinet, pure honest modelling that should have received more votes in the diorama challenge.

_________________
Commission Service Available

mallysminiatures.blogspot.co.uk
Top
  Profile  
Reply with quote  
 Post subject: Re: Dr Grant's WIP [TOS Battle of 5 Armies Display Board]
PostPosted: Thu Jul 31, 2014 9:53 pm 
Ringwraith
Ringwraith
User avatar
Offline

Joined: Tue Jul 20, 2010 2:33 pm
Posts: 2145
Location: South West England, UK
Really good, really, really good, well deserved and great to see

_________________
Harfoots-The first of the Hobbit people to cross over the Misty Mountains and enter Eriador.
Top
  Profile  
Reply with quote  
 Post subject: Re: Dr Grant's WIP [TOS Battle of 5 Armies Display Board]
PostPosted: Mon Aug 04, 2014 6:40 pm 
Ringwraith
Ringwraith
User avatar
Offline

Joined: Fri Aug 03, 2012 1:50 pm
Posts: 1339
Thanks for all the great comments guys, very much appreciated, I must admit it was a bit of a chore getting it all typed up but I'm glad to see that people appreciated the effort and it's nice to have it to look back on in years to come!

@Gandlaf - that's very kind to say about the diorama challenge but I don't think it's fair on yourself and the other entrants. It was never meant to be a diorama and I only entered it as an afterthought, all three of the other entries answered the brief much better than mine and deserved to come ahead of me. Thanks again for the comments though, they really are greatly appreciated!

So, putting the behind the scenes of the BOFA display board behind me it's time to catch up on what I've been doing since then, fear not, it won't take long...

Alas, moving into a new house and the fantastic weather we've had lately has meant that I really haven't had much time for painting and in the 5 weeks since my last posted models (Thrydan and the Hobbits) all I've managed to complete is Beorn in bear form :sad:

He was good fun to paint, very quick and easy and I've already had great fun using him in 3 games. I must say a massive thanks to DMS for giving me the awesome tip of highlighting the bear by mixing Vomit Brown (of all things) into black instead of using grey. This sounds like a crazy idea but works really well and gives the impression of highlights without making the model look overly grey which is always a problem I've had in the past - cheers Kev!

I found it really hard to take decent photos that showed off the paintjob and the transitions of colour but hopefully these pics give a decent enough idea!

Image

Image

Image

Image

As I said I'm really pleased with how he came out but I know it's not the most exciting update!

And so with that I could finally put my Battle of Five Armies project behind me (although, of course, by the very nature of the theme there's always more models to add to it!) and get stuck into my next project.

I decided, after a bit of deliberation, that I would move onto my Army of Thror next, I've got a 1000 point army planned out and the 10 converted Warrriors of Erebor (see page 10 of this thread) from my BOFA list made the ideal start.

So, I dived back into the big box of unpainted models and found another 12 Grimhammers. A fun few hours of cutting, drilling and gluing later and I'd converted another 6 into Warriors of Erebor as well as assembling 6 to be actual Grimhammers.

Image

Image

They were fiddly as before but very satisfying to complete and once more I'm really happy with the poses (with the exception of the one at the back left which I'm not particularly keen on).

Since these photos were taken I've been ploughing on with the 8 Warriors of Erebor (I had 2 unpainted ones left over from my last batch) and they're nearly finished. With any luck I'll be able to get them done this week and get some photos up by the weekend.

After that it will be the tricky decision of whether to plough on and paint the 6 Grimhammers or treat myself to Thror and/or Thrain, thoughts?

Cheers as always guys, hopefully I might be getting back to slightly more regular updates from here on out!

_________________
Finished 2nd in the 2014 GBHL. My Wife's so proud

Free SBG fanzine: viewtopic.php?f=1&t=29569
Top
  Profile  
Reply with quote  
 Post subject: Re: Dr Grant's WIP [Beorn in Bear form]
PostPosted: Mon Aug 04, 2014 7:33 pm 
Loremaster
Loremaster
User avatar
Offline

Joined: Tue May 07, 2013 1:11 am
Posts: 1091
Location: Massachusettes
Images: 3
great work. Converting is rewarding for sure. I think they look great and having both Warriors and Grim Hammers in the same armor style will make the force look awesome. Will be here when you post those 8 painted.

Oh yeah, And the bear looks great too. This is the first time I have seen a side shot of him. I didn't buy this model so I only get to see pictures of other peoples work, will help when it comes time to attempt sculpting him.

_________________
http://www.sithious.webs.com
Top
  Profile  
Reply with quote  
Display posts from previous:  Sort by  
Post new topic Reply to topic  [ 259 posts ]  Go to page Previous  1 ... 9, 10, 11, 12, 13  Next

All times are UTC


Who is online

Users browsing this forum: No registered users and 25 guests


You cannot post new topics in this forum
You cannot reply to topics in this forum
You cannot edit your posts in this forum
You cannot delete your posts in this forum
You cannot post attachments in this forum

Search for:
Jump to: