All times are UTC


It is currently Sun Apr 28, 2024 7:46 pm


Post new topic Reply to topic  [ 620 posts ]  Go to page Previous  1, 2, 3, 4, 5 ... 31  Next
Author Message
 Post subject: Re: Celevue's LotR campaign - behind the scenes & WIP
PostPosted: Tue Feb 12, 2013 1:52 pm 
Craftsman
Craftsman
User avatar
Offline

Joined: Thu Feb 02, 2012 6:32 am
Posts: 362
Images: 14
Oh wow, this is unreal. I wish you the best of luck what a mighty project. Please update as regularly as possible!

_________________
CMON Gallery http://www.coolminiornot.com/artist/Green_Dragon
Top
  Profile  
Reply with quote  
 Post subject: Re: Celevue's LotR campaign - behind the scenes & WIP
PostPosted: Tue Feb 12, 2013 2:31 pm 
Craftsman
Craftsman
User avatar
Offline

Joined: Wed Feb 16, 2011 2:33 pm
Posts: 363
Location: Duncanville, TX
Images: 12
This is amazing!
Top
  Profile  
Reply with quote  
 Post subject: Re: Celevue's LotR campaign - behind the scenes & WIP
PostPosted: Tue Feb 12, 2013 7:20 pm 
Ringwraith
Ringwraith
User avatar
Offline

Joined: Tue Jul 20, 2010 2:33 pm
Posts: 2145
Location: South West England, UK
More photos of the statues please.

You have more stock than GW do!

_________________
Harfoots-The first of the Hobbit people to cross over the Misty Mountains and enter Eriador.
Top
  Profile  
Reply with quote  
 Post subject: Re: Celevue's LotR campaign - behind the scenes & WIP
PostPosted: Tue Feb 12, 2013 7:40 pm 
Elven Warrior
Elven Warrior
User avatar
Offline

Joined: Fri Mar 06, 2009 5:13 pm
Posts: 791
Location: Manchester UK
Images: 10
Awesome post fella will def be keeping an eye on this
Top
  Profile  
Reply with quote  
 Post subject: Re: Celevue's LotR campaign - behind the scenes & WIP
PostPosted: Tue Feb 12, 2013 9:19 pm 
Wayfarer
Wayfarer
User avatar
Offline

Joined: Wed Jan 23, 2013 9:06 pm
Posts: 37
This is great, can't wait for more updates.
All those minis are making me drool :shock:
Top
  Profile  
Reply with quote  
 Post subject: Re: Celevue's LotR campaign - behind the scenes & WIP
PostPosted: Wed Feb 13, 2013 1:01 pm 
Elven Warrior
Elven Warrior
User avatar
Offline

Joined: Thu Feb 09, 2012 10:19 pm
Posts: 900
Location: Essex England
Nice scenery, nice painting :yay:. Nice backlog but will you ever get around to painting and finishing?

_________________
You would of had me crawling on all fours like a BEAST!
Top
  Profile  
Reply with quote  
 Post subject: Re: Celevue's LotR campaign - behind the scenes & WIP
PostPosted: Wed Feb 13, 2013 9:16 pm 
Craftsman
Craftsman
User avatar
Offline

Joined: Fri May 22, 2009 3:17 am
Posts: 381
Location: Tampere, Finland
Images: 21
Again, thanks for the great comments! @SidTheSloth, I guess I will be doing quite a bit of M-E over the course of the campaign. The Black Gate is optional – it will be built if the story requires it. But we have no need for a Barad-dûr. At the moment, we will also not play Hobbit, so there is no need for Goblin town or Mirkwood.

@Harfoot, I assume you mean the large Argonath statues? I will grab a couple of additional photos for you soon.

@John Wayne – I am patient, and our campaign has no need for rush. I will attempt to build & paint Rohan and Isengard armies during this year, aiming for serial / mass production to an acceptable quality. I will not attempt painting all the figures to anywhere near exhibition / contest quality. Spray can for dominant color, a few additional colors with brush, shading, and highlighting for the figures, and, separately, spray can for bases, dip into glue + dip into turf. Then combine figure + base, and touch up to hide the slot. Similar process as with the bases for the movement trays.
Top
  Profile  
Reply with quote  
 Post subject: Re: Celevue's LotR campaign - behind the scenes & WIP
PostPosted: Wed Feb 13, 2013 9:21 pm 
Craftsman
Craftsman
User avatar
Offline

Joined: Fri May 22, 2009 3:17 am
Posts: 381
Location: Tampere, Finland
Images: 21
Terrain building work continued yesterday with the pouring of resin water on one of the two river terrain tiles. This is the first time I worked with Woodland Scenics’ realistic water, and I was a bit nervous – the stuff apparently escapes through the tiniest of holes or cracks, and the bottom should be absolutely level, otherwise the resin will pool on the lower part of the river / lake base. Here you can see my careful attempts to combat both of these known issues – the base should be quite level, and to ensure that my masking tape dam held, I caulked it with another Woodland Scenics product, Water effects, which is otherwise intended to be used on top of the cured realistic water to produce waves. Water effects is white out of the bottle, but dries clear. I gave it about a week to cure before pouring the Realistic water.

Image

Image

Here goes nothing… the river bottom required one and a half bottles of Realistic water to cover. I used brush to coax the water between the reeds and all the way to the shoreline (the instructions say you should pour it to the center to avoid capillary seeping).

Image

Image

This is how the river looked immediately after the Realistic water had been poured – quite reflecting and still…

Image

Alas, my method of setting the tile level using newspapers probably wasn’t enough – the weight of the Realistic water must have offset the balance. This evening I checked on the drying process, only to note that the water had, indeed, pooled to the other end of the river…

Image

As an additional insult, the Water effects I used to secure the masking tape dam had actually turned back to white. This was an unexpected effect – I’m hoping that it will turn transparent again, but am not holding my breath. For the next water projects, I will use silicone as sealant. I had also hoped to make do with just one layer of Realistic Water, but now I need to pour more at least to the “shallow end” of the river. As you can see from the final photo, the other, “deep” end looks quite like it did the day before.

Image

I’ll post an update in a couple of days after pouring the second layer (and propping the tile so that it has a very slight incline towards the “shallow end”). I'm also working on the foam horses of the Ford of Bruinen, but more on that later this week - along with updates about building the Hollin Gate of Moria.
Top
  Profile  
Reply with quote  
 Post subject: Re: Celevue's LotR campaign - behind the scenes (2/13 - wate
PostPosted: Thu Feb 14, 2013 8:18 am 
Loremaster
Loremaster
User avatar
Offline

Joined: Sat Oct 09, 2010 11:20 am
Posts: 1776
Wow... just wow.
Top
  Profile  
Reply with quote  
 Post subject: Re: Celevue's LotR campaign - behind the scenes (2/13 - wate
PostPosted: Thu Feb 14, 2013 8:53 am 
Loremaster
Loremaster
Offline

Joined: Thu Feb 09, 2012 11:01 am
Posts: 1829
Location: Lancashire
You seem to be having some problems with the river but to be honest it still looks pretty damned amazing 8)

_________________
My Miniatures Blog (covering LOTR/Terminator/Doctor Who/Warpath and more!):
http://cruciumgiger.blogspot.co.uk/
Top
  Profile  
Reply with quote  
 Post subject: Re: Celevue's LotR campaign - behind the scenes (2/13 - wate
PostPosted: Fri Feb 15, 2013 1:59 pm 
Craftsman
Craftsman
User avatar
Offline

Joined: Fri May 22, 2009 3:17 am
Posts: 381
Location: Tampere, Finland
Images: 21
As promised, here are two more pics of the Argonath statues. Both have a non-canon staircase + door on the side facing away from the river. These will disappear from sight once I embed the statues to hillsides in the Amon Hen / Amon Lhaw scenery piece, to be built in the future. There's a figure of Gandalf on the stair to give you a better sense of scale. The river tile, by the way, has given me a positive surprise - the Woodland Scenics water effects has turned back to transparent after giving me a scare earlier. I will soon pour another layer of Realistic Water (but only after the mailman brings me two extra bottles - I'm now down to my last half a bottle, and that might not be enough).

Image

Image

Meanwhile, here's a progress photo of the Ford of Bruinen foam horses. The Ebob horses are now embedded into the styrofoam wave, and the entire wave has been covered with putty. Next, I will apply acrylic gel medium overall to give the wave a water-like texture.

Image

Finally, here's Gandalf looking at an early draft of the Moria door. I'm about to start cutting parts for the Hollin gate board, and more updates will follow soon.

Image
Top
  Profile  
Reply with quote  
 Post subject: Re: Celevue's LotR campaign - behind the scenes (2/13 - wate
PostPosted: Fri Feb 15, 2013 2:11 pm 
Loremaster
Loremaster
User avatar
Offline

Joined: Sun Jun 10, 2012 8:52 pm
Posts: 1815
Images: 10
You must have some serious budget!

Looks great so far though! 8) :yay:

_________________
'Though my memory's fading, I remember two things very clearly: I am a great sinner and Christ is a great Savior'
-John Newton
Top
  Profile  
Reply with quote  
 Post subject: Re: Celevue's LotR campaign - behind the scenes (2/13 - wate
PostPosted: Fri Feb 15, 2013 2:17 pm 
Kinsman
Kinsman
User avatar
Offline

Joined: Mon Oct 22, 2012 9:31 pm
Posts: 128
Wow this looks so awesome! I'm going to follow this WIP for sure =)
Top
  Profile  
Reply with quote  
 Post subject: Re: Celevue's LotR campaign - behind the scenes (2/13 - wate
PostPosted: Fri Feb 15, 2013 2:57 pm 
Craftsman
Craftsman
User avatar
Offline

Joined: Fri May 22, 2009 3:17 am
Posts: 381
Location: Tampere, Finland
Images: 21
@Sid, not a serious as I would want it to be!
@Quendil, I am fortunate to have three work areas. The main hobby space is a former generic storage room, about 34 sqm or so, which will at some future date house the model railway I'm planning. But in the meanwhile, the already-built benchwork (about 20 sqm or so) serves as storage / work surface for larger terrain pieces. For figure painting and more delicate modeling, I have a small dedicated hobby room, and I do spray can painting (mostly basecoating figures) either outside (summertime) or in the garage (wintertime).
Top
  Profile  
Reply with quote  
 Post subject: Progress on foam horses
PostPosted: Sun Feb 17, 2013 10:55 pm 
Craftsman
Craftsman
User avatar
Offline

Joined: Fri May 22, 2009 3:17 am
Posts: 381
Location: Tampere, Finland
Images: 21
Hi folks,

A couple of photos of the foam horses - I've coated the entire piece quite liberally with acrylic gel medium to give it a uniform texture.

Image

Here is a close-up of the horses.

Image

Next step: painting...
Top
  Profile  
Reply with quote  
 Post subject: Moria gate board - work begins
PostPosted: Sun Feb 17, 2013 11:20 pm 
Craftsman
Craftsman
User avatar
Offline

Joined: Fri May 22, 2009 3:17 am
Posts: 381
Location: Tampere, Finland
Images: 21
I've now started work on the Moria west gate board. It will follow the layout of the Fellowship journey book board, but will be a bit wider (i.e. my standard size of 80 x 90 cm). In addition to the Wall of Moria, the Doors of Durin and the Watcher's pool, I wanted to add the small creek to the norther edge of the pool, as described in LotR ("it was green and stagnant, thrust out like a slimy arm towards the enclosing hills"). I also wanted to add some details to the chamber immediately beyond the doors. Since this chamber is not as wide as the board, there will be some unused space in the two corners of the board. Additional design considerations arise due to my storage shelves, which allow a board of up to 17cm height. I wanted the Wall of Moria (and the holly trees) to be taller, so they must be detachable. Here is a rough plan of the board.

Image

Based on the plan, I cut a 20cm tall, 80 cm long piece of 3cm foam to act as a backing for the Wall of Moria, and proceeded to do initial placement of various rock pieces (Noch foam rocks as well as rocks cast with Woodland Scenics molds):

Image

I drew some designs for the chamber, following a similar pattern to the Balin's tomb board, and cut some more blue foam...

Image

...as well as 3mm foamboard for the trimming.

Image

I cut two layers of 5mm foamboard around the Watcher's pool - the stepped layers were camfered, and will be later covered with putty. Befre that, however, I hot glued the rock pieces to the vertical divider as well as to the northern (left) board edge.

Image

Then comes a fun (albeit messy) stage - I filled the gaps between the rocks with plaster cloth. When the plaster is dry, I will add some thick hydrocal and do some rock sculpting.

Image

Image

I also started work on the holly trees guarding the door. Since they are quite tall (and their above-ground roots are such an iconic sight), I have started with two Woodland Scenics tree armatures, and amended them with additional wire branches and roots.

Image

The next steps will be the aforementioed rock sculpting, and smoothing the ground with putty. Plenty of smaller rocks and talus will be added next, followed by painting. The holly trees will get a coat of flexi-bark and some paint. For the couple of dead trees sticking out of the water, I will probably settle for bare WS armatures without any add-ons.

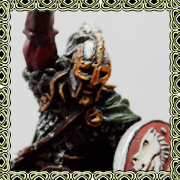
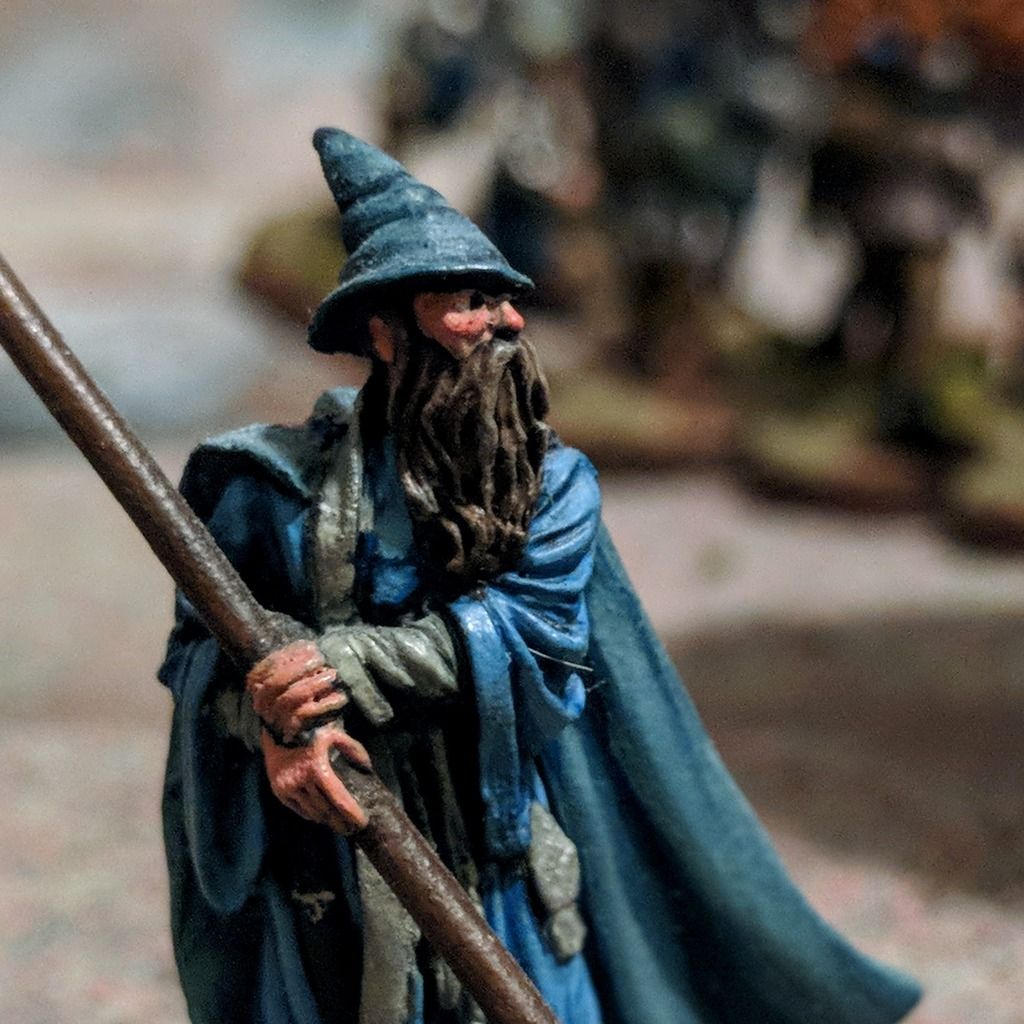
I also need to finish painting the Watcher, as well as few dwarves (including Ori and Oin). But more on those in another post in the near future. Stay tuned...
Top
  Profile  
Reply with quote  
 Post subject: Re: Celevue's LotR campaign -behind the scenes (18/2 Moria G
PostPosted: Sun Feb 17, 2013 11:28 pm 
Loremaster
Loremaster
User avatar
Offline

Joined: Mon Jan 14, 2013 2:49 pm
Posts: 1038
Location: Germany
Oh my this is looking so good already.. I wanna cry..
Can i visit you in Finland to help you with this? ^^

_________________
Check out my WIP: www.one-ring.co.uk/viewtopic.php?f=50&t=24858
Top
  Profile  
Reply with quote  
 Post subject: Re: Celevue's LotR campaign -behind the scenes (18/2 Moria G
PostPosted: Mon Feb 18, 2013 12:21 am 
Ringwraith
Ringwraith
User avatar
Offline

Joined: Wed Jul 06, 2005 7:09 pm
Posts: 2393
Location: Southampton, UK
Images: 70
Cool. What an awesome looking terrain thread. Top job fella!

_________________
You don't have to be great to start. But you do have to start to be great.
Top
  Profile  
Reply with quote  
 Post subject: Re: Celevue's LotR campaign -behind the scenes (18/2 Moria G
PostPosted: Mon Feb 18, 2013 1:41 am 
Craftsman
Craftsman
User avatar
Offline

Joined: Sun Mar 07, 2010 7:08 pm
Posts: 413
Location: Northern Ireland
My word, you're very good at this!

_________________
Better, though difficult, the right way to go, than wrong, though easy, where the end is woe. John Bunyan - Pilgrim's Progress
Top
  Profile  
Reply with quote  
 Post subject: Re: Celevue's LotR campaign -behind the scenes (18/2 Moria G
PostPosted: Mon Feb 18, 2013 8:13 am 
Loremaster
Loremaster
User avatar
Offline

Joined: Sat Oct 09, 2010 11:20 am
Posts: 1776
Blimey that looks amazing.
Top
  Profile  
Reply with quote  
Display posts from previous:  Sort by  
Post new topic Reply to topic  [ 620 posts ]  Go to page Previous  1, 2, 3, 4, 5 ... 31  Next

All times are UTC


Who is online

Users browsing this forum: No registered users and 56 guests


You cannot post new topics in this forum
You cannot reply to topics in this forum
You cannot edit your posts in this forum
You cannot delete your posts in this forum
You cannot post attachments in this forum

Search for:
Jump to: